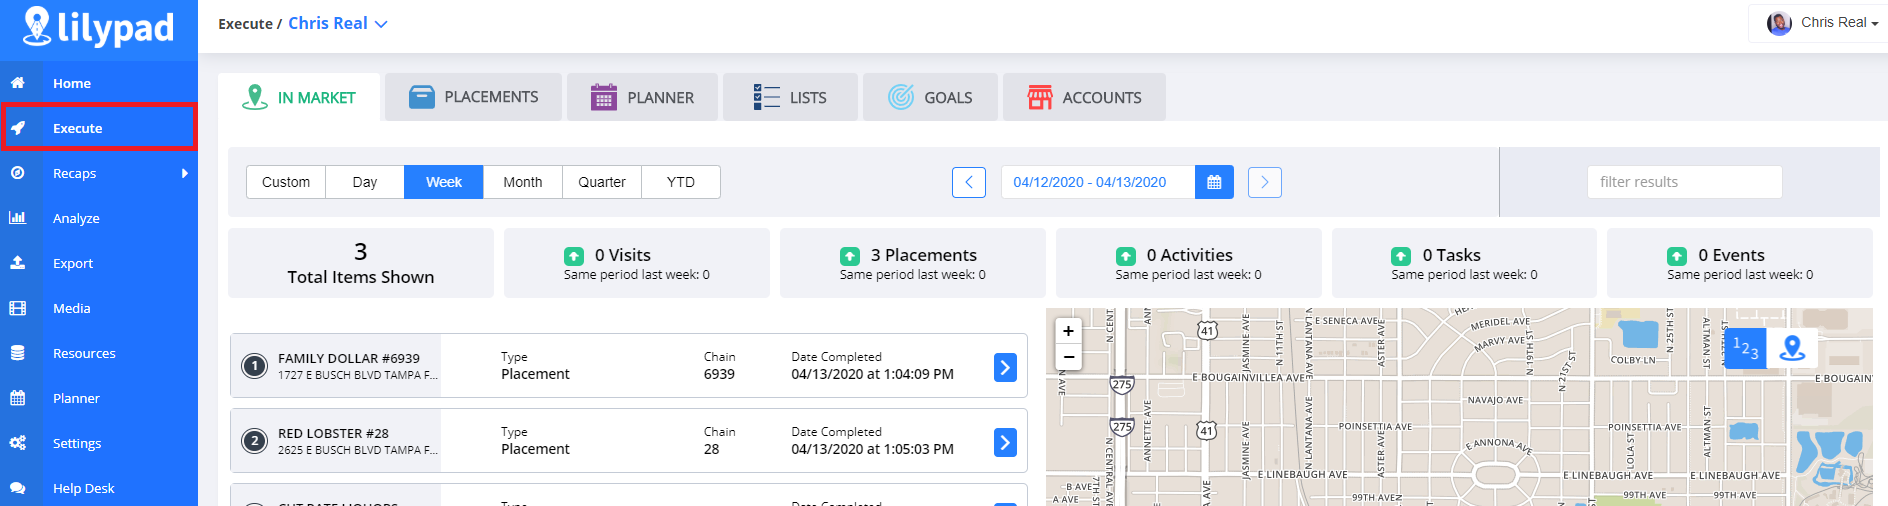
In Market

The In Market tab in the Execute - Sidebar is useful to see an overview of all market activity for a user(s) within a selected time frame.
**NOTE - Managers will be able to view info for each rep of their assigned teams by using the drop down above the In Market tab. Users without Manager access will only be able to view their individual info.
Directly below the In Market tab, the desired time frame buttons will allow you to select between Custom, Day, Week, Month, Quarter, and Year to Date views. Use the arrows next to the date field to toggle to previous time periods based on the time frame you selected.

Below the time frame field, you'll see a high level overview of the total number of logged items to include: Visits, Placements, Activities, Tasks, Events. Below each of these item sections, a comparison to the same period last (week, month, quarter, etc.) is available based on the time frame you previously selected.

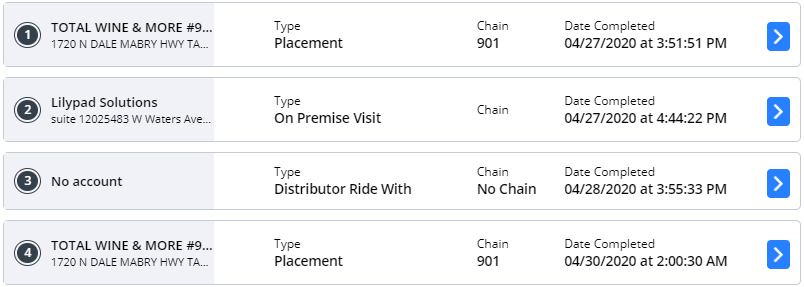
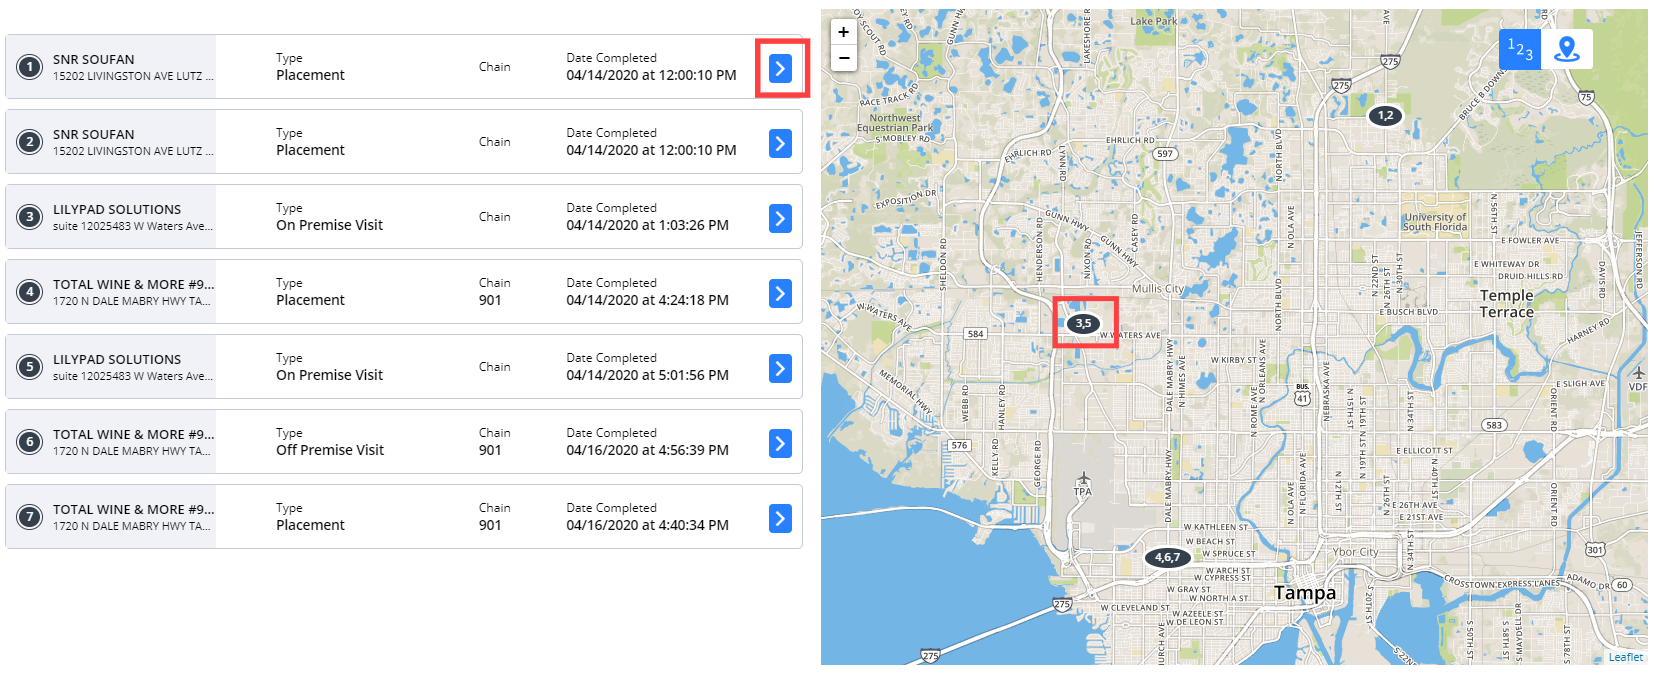
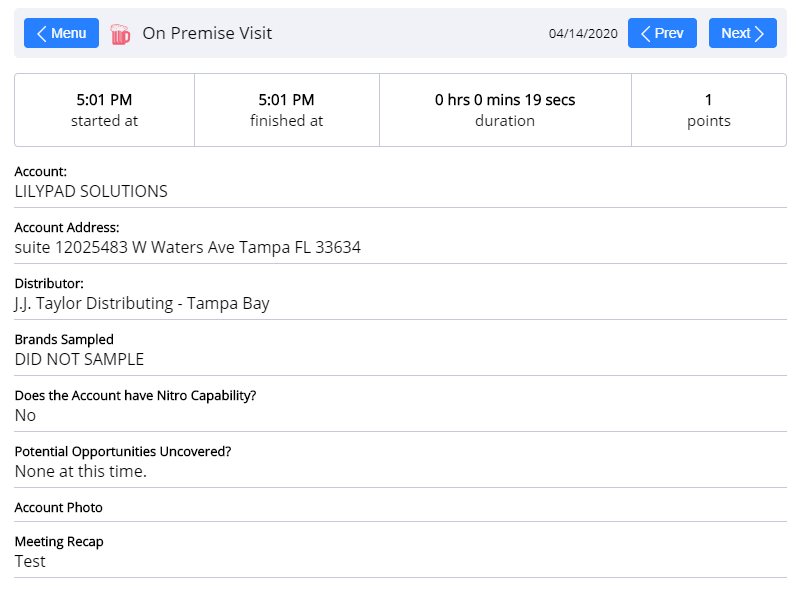
Directly below the Total Items Shown box, will be a list of all the logged items within the selected time frame with a detailed breakdown of each of the entries. The list appears in chronological order with the oldest entry appearing first.
The logged items list contains information on each entry to such as: Account Name & Address, Type of entry (Activity, Task, or Placement), Independent or Chain account, and Date/Time completed.
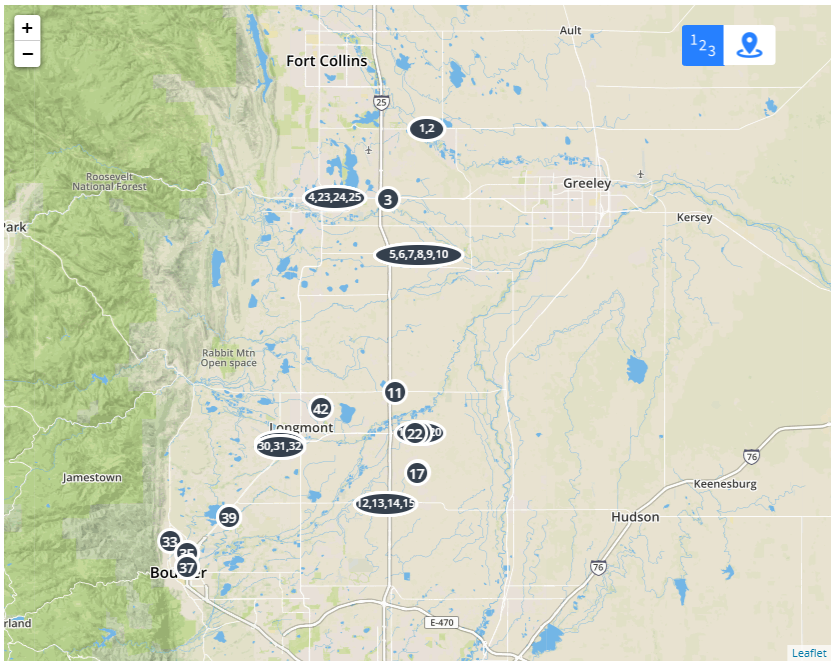
To view the map as traditional pushpins rather than chronological numerical markers, toggle to the pushpin icon in the the top right of the map screen.
To view additional details on a specific entry and the accountthe entry was logged at, click the blue arrow to the right of date/time of an entry or click the account pushpin on the map.
The list view will change to instead show the details of that individual log. (click the blue "menu" button above the entry "start and finish" times to return to the list view)
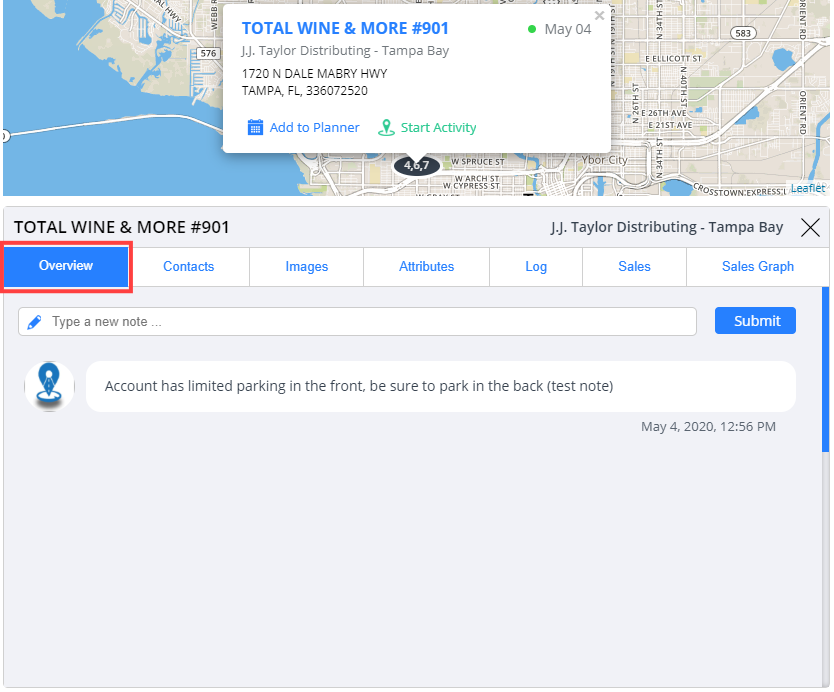
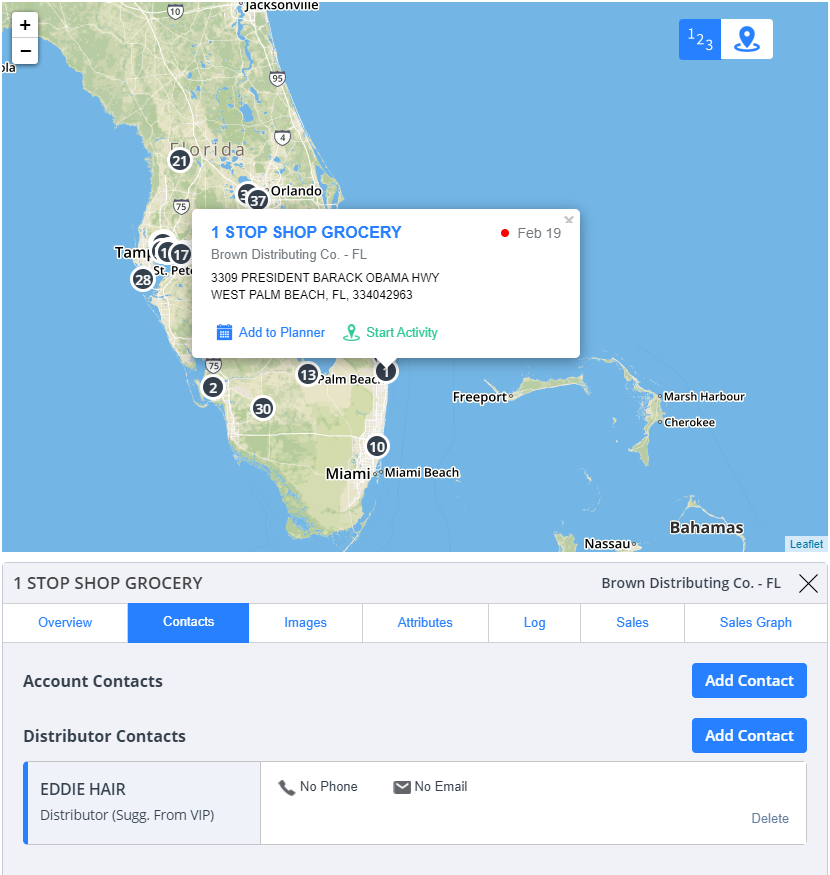
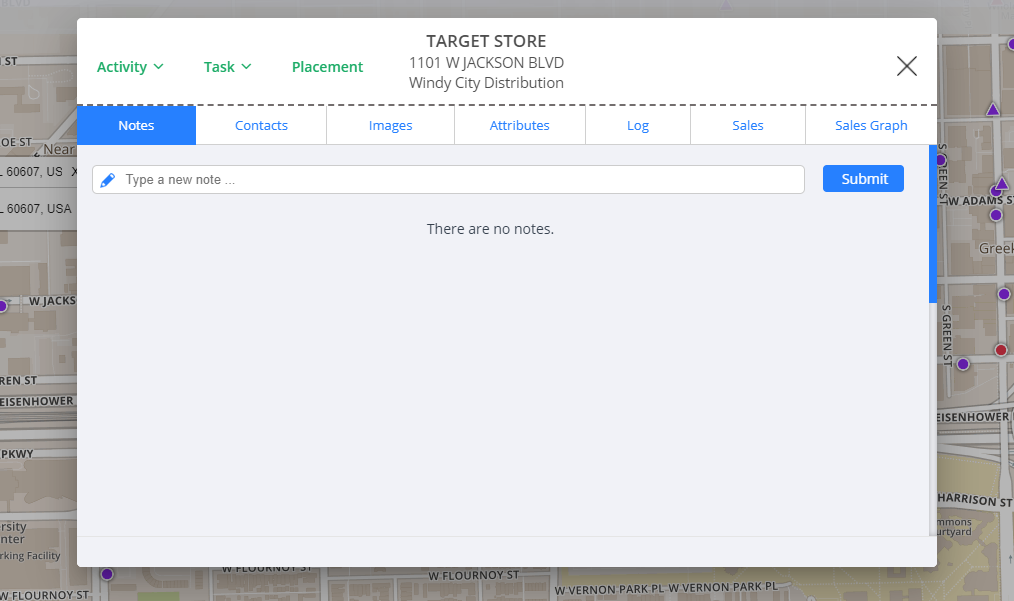
Overview tab: where users can view and enter general notes about the account (web equivalent of the account details > notes section in the mobile app)
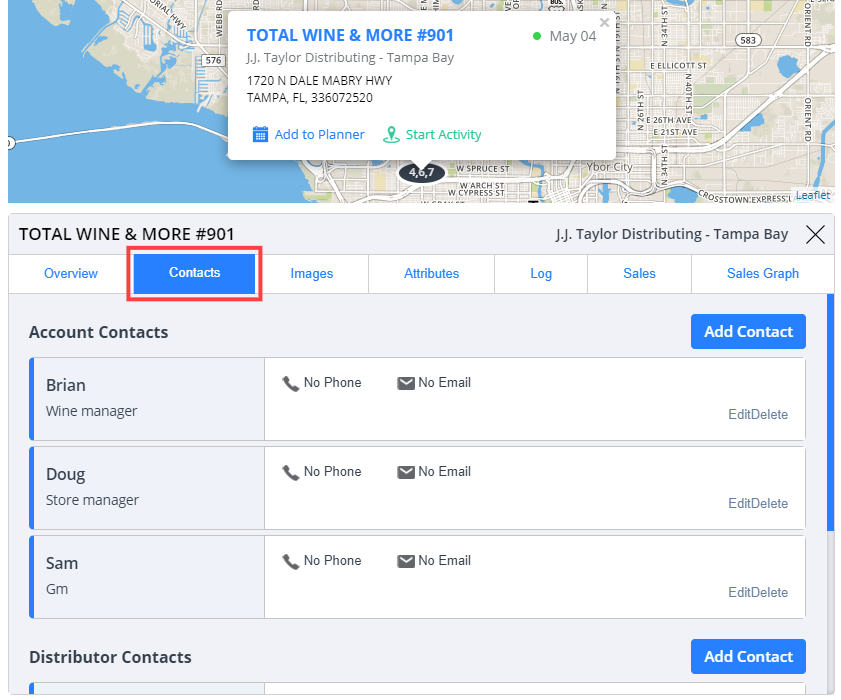
Contacts tab : where users can view, add, edit, and delete account and distributor contacts (web equivalent of the account details > contacts tab in the mobile app)
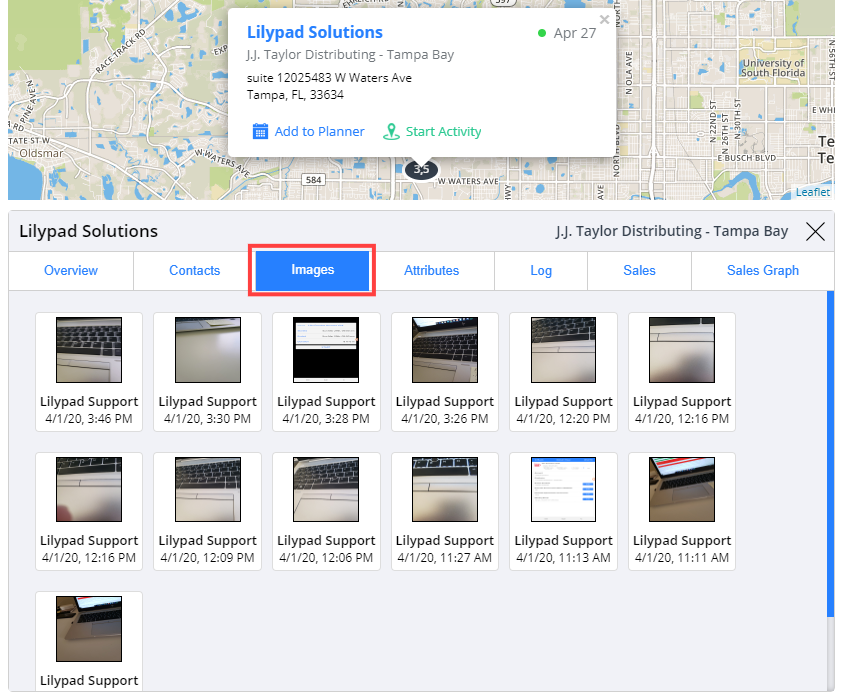
Images tab : where users can view all photos that have been tied to this account previously (web equivalent of the photos shown under account details > info in the mobile app)
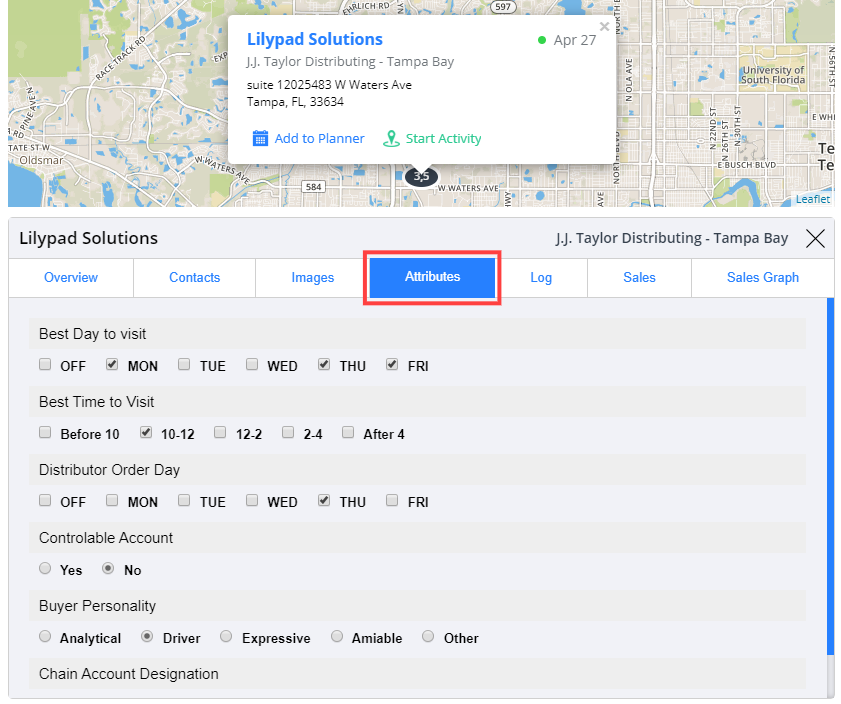
Attributes tab: where users can view and set any attributes that apply to this account (web equivalent of the account details > attributes tab)
Log tab: where users can see all previously logged activities, tasks, and placements for this account. Users can click into the arrow to the right of a specific log, to view details from that specific log (web equivalent of the account details > log tab)

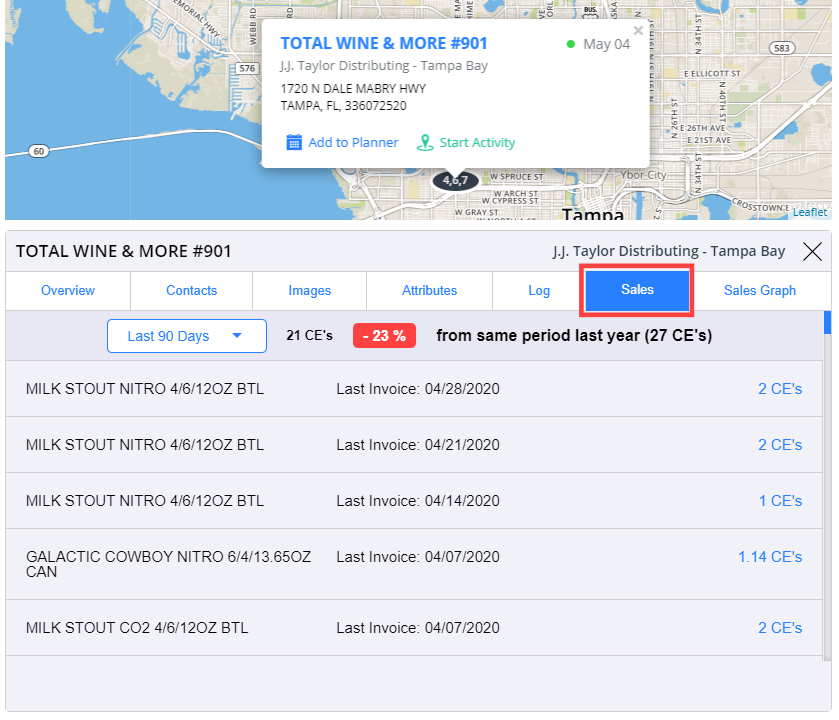
Sales tab: where users can view a 30, 60, or 90 day sales snapshot for all invoices reported to Lilypad under this account (web equivalent of the Sales quick-link at the top of your activities on mobile)
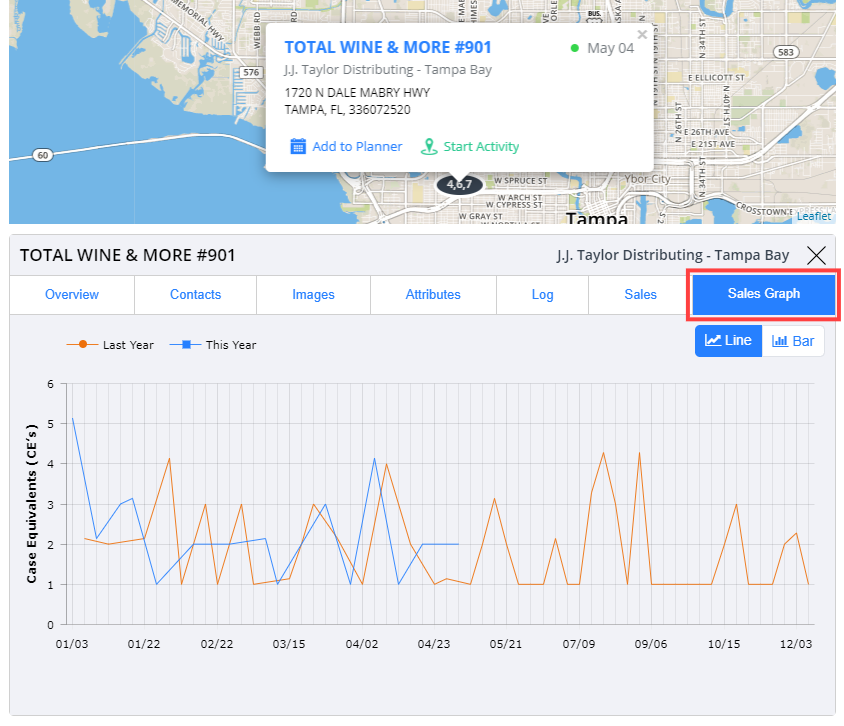
Sales Graph tab: where users can view a line graph that outlines sales data for all days on which we received invoices with a comparison of this year (blue line) and last year (orange line). (web equivalent of the account details > sales tab)
Placements
The Placements tab in the Execute - Sidebar allows a user to view which stage previously entered placements are currently in (web equivalent of Blue Pushpin > Placements tab in mobile).
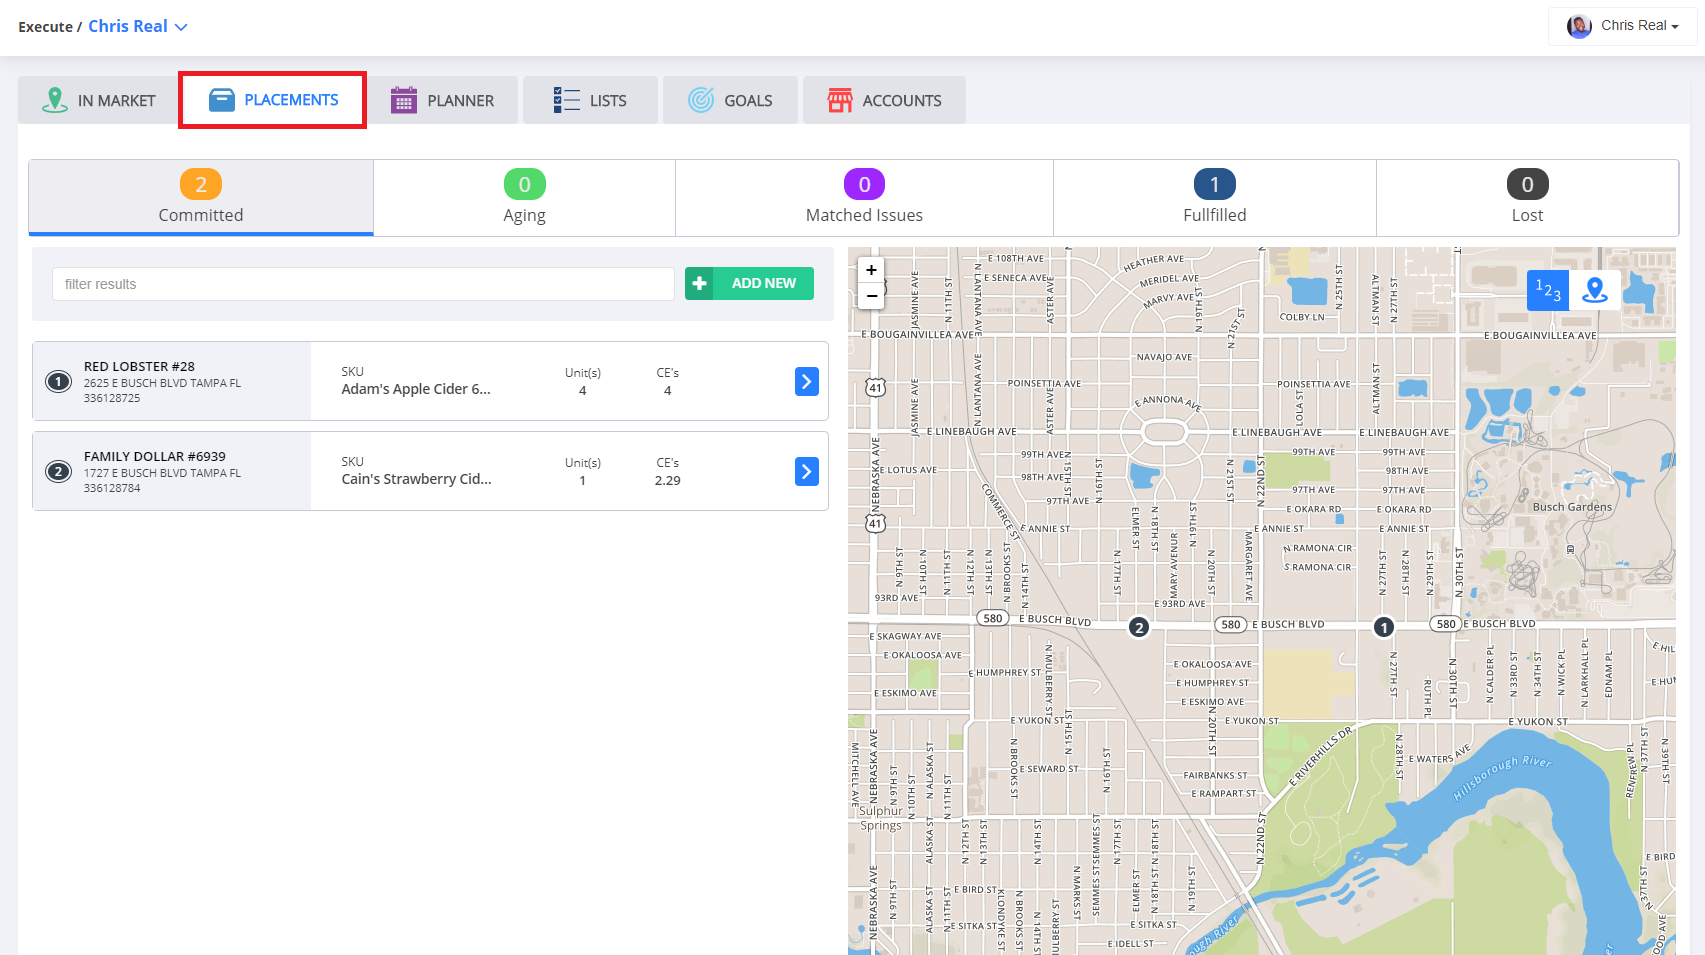
The placement tracker consists of 5 stages:
Committed - The initial stage where ALL placements entered by a user go while Lilypad waits to receive an invoice matching that placement. The number of days a placement will remain in this stage while Lilypad searches for an invoice is dependent on what was chosen by your Organization's Admin during the Lilypad setup process.
**NOTE: Lilypad's default setting is 21 days in this stage. If unsure, contact lpsupport@fintech.com to confirm your Org's day amount settings for this stage.
Aging - The next stage ALL placements will enter when the allotted day amount in Committed has been reached and Lilypad still has not received a matching invoice. The number of days a placement will remain in this stage while Lilypad searches for an invoice is dependent on what was chosen by your Organization's Admin during the setup process.
Other available info in this stage/tab include:
- A chronological list of each placement along with the account name, address, SKU committed, number of units committed, and number of CEs the placement is worth.
- Click the blue arrow to the right of any of the placements to view additional details such as:
- "Promise by Date" (date the user entering the placement expected it to land into the account) or "Days Open" (number of days since the promise by date has passed)
- Wholesaler/Distributor responsible for the account
- Wholesaler/Distributor contact responsible for servicing the account
- "Approved By": indicates who at the account approved the placement
- A map that shows where each account with an outstanding commitment is located. Below the map is the account details info.
**NOTE: Lilypad's default setting is 21 days in this stage. If unsure, contact lpsupport@fintech.com to confirm your Org's day amount settings for this stage.
Matched Issues - The stage where ALL placements that have partially matched to an invoice will enter. Placements will remain in this stage until the user manually directs Lilypad on how to move forward with it.
In Lilypad, placements will partially match to an invoice for 1 of 2 reasons:
-
SKU Discrepancy
- Ex: an account commits to a 1/6BBL Keg of Brand A but is instead invoiced for a 4/6/12 Pack of Brand A –-> same brand, different SKU = Matched Issue
-
Unit Discrepancy
- Ex: an account commits to 2 units of 1/6BBL Kegs of Brand A but is instead invoiced for only 1 unit of 1/6BBL Keg of Brand A –-> same brand, same SKU, different number of units = Matched Issue
**NOTE: ONLY the user who entered the placement is is capable of directing Lilypad what to do with it. The user who entered the placement will choose from one of the following options:
- Accept and Close: Take credit for what already landed in the account and move the remainder to "Lost"
- Accept and Wait for Exact SKU Match: Take credit for what already landed in the account and move the remainder back to "Committed" or "Aging" (depending on Org's day amount settings and how many days the placements been open) while Lilypad continues to search for an invoice to match the placement.
Fulfilled - The stage where ALL placements that have matched to an invoice will enter. The placements in this stage are based on the current month.
Other available info in this stage/tab include:
- Overview of total number of placements & CEs entered for the month
- Total Fulfilled
- Total Remaining
- Closing Percentage
- A list view of all fulfilled placements along with account name, address, SKU committed, number of units committed, number of CEs the placement is worth, and the date the placement was matched to an invoice confirming fulfillment.
- Click the blue arrow to the right of any of the placements to view additional details such as:
- Wholesaler/Distributor responsible for the account
- Wholesaler/Distributor contact responsible for servicing the account
- "Approved By": indicates who at the account approved the placement
- A map that shows each account where a placement was fulfilled. Below the map is the account details info.
Lost - The stage where ALL placements that have timed through the Lilypad system without ever matching to an invoice will enter. The placements in this stage are based on the current month.
Other available info in this stage/tab include:
- A list view of lost placements along with account name, address, SKU committed, number of units committed, number of CEs the placement is worth, and the date the placement was originally entered.
- Click the blue arrow to the right of any of the placements to view additional details such as:
- Wholesaler/Distributor responsible for the account
- Wholesaler/Distributor contact responsible for servicing the account
- "Approved By": indicates who at the account approved the placement
Planner

The Planner tabin the Execute - Sidebar allows a user to view and manage all upcoming items on their Lilypad calendar (web equivalent of Blue Pushpin > Plan tab > Calendar in mobile).
This tab consists of two types of views users can toggle between: Calendar and Plan vs. Actual
Calendar view:
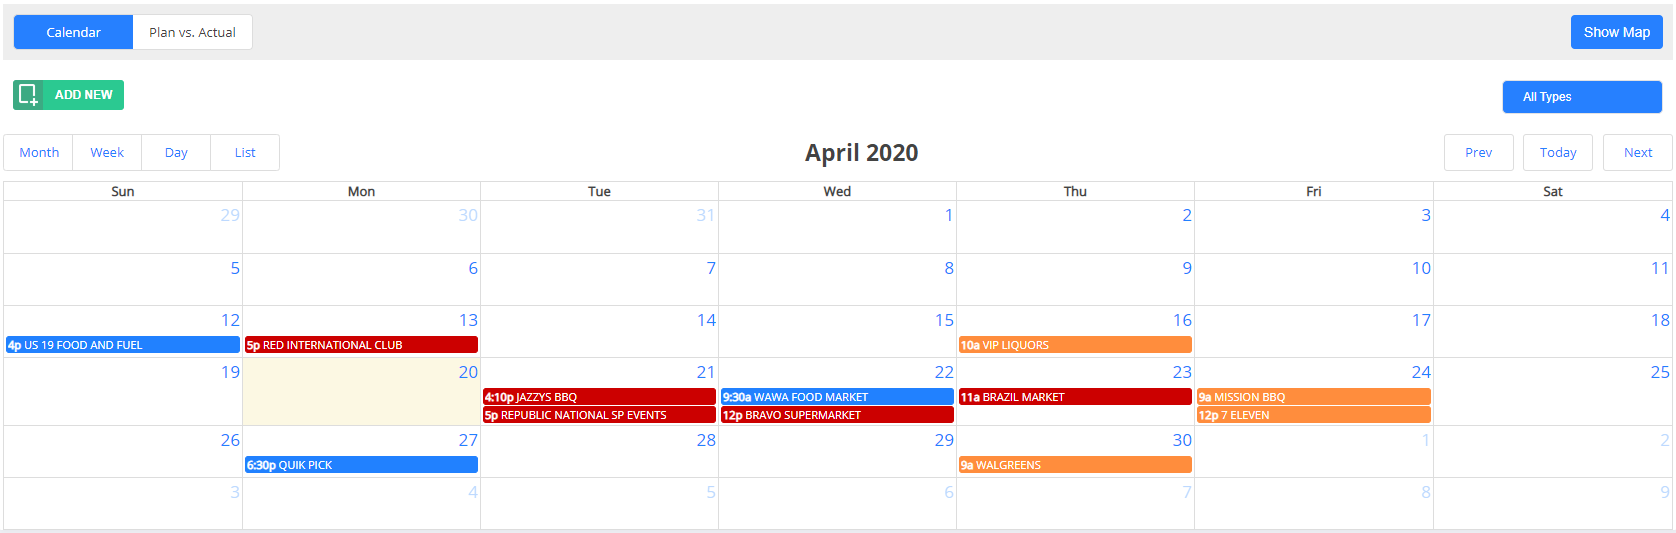
- Users can choose between monthly, weekly, daily, or a list view of their upcoming planner items by selecting one of the options found below the green "Add New" button.
- At the top right of the calendar, users have additional toggles to see previous and future periods, or go directly to the current day.
- The blue "All Types" button allows a user to filter the calendar by the type of planner item (Visit, Follow Up, Event, etc.)
- The "Show Map" or "Hide Map" button allows the user to show a map that chronologically depicts the location of each planner item for the selected time frame.
- Users can click one of the account pushpins from the map to see additional account information populate below the map screen.
To add new planner items, follow the steps below:
- Click green "Add New" button (located below the "calendar" view toggle).
- Choose the Planner Item you’d like to add to your calendar.
- Users have 8 options to choose from: Visit, Follow Up, Event, Meeting, Work With, Warehouse Visit, Admin Time, and Out of Office
- If choosing an account specific planner item (i.e. Visit, Follow Up, or Event), search and select the distributor and the account.
- Enter a Date and Time.
- Choose a duration length.
- Choose whether to make the planner item recurring.
- Choose whether to have a reminder sent for the upcoming item.
- **NOTE: Check the “Send calendar invite” box to send a calendar invitation to the email associated with your Lilypad profile, then go to your email inbox and accept the calendar invite to add the planner item to your default device calendar.
- Enter notes about your planner item.
- Click green “Create” button.
- The planner item will be available on both the Lilypad web and mobile app
Plan vs. Actualview:
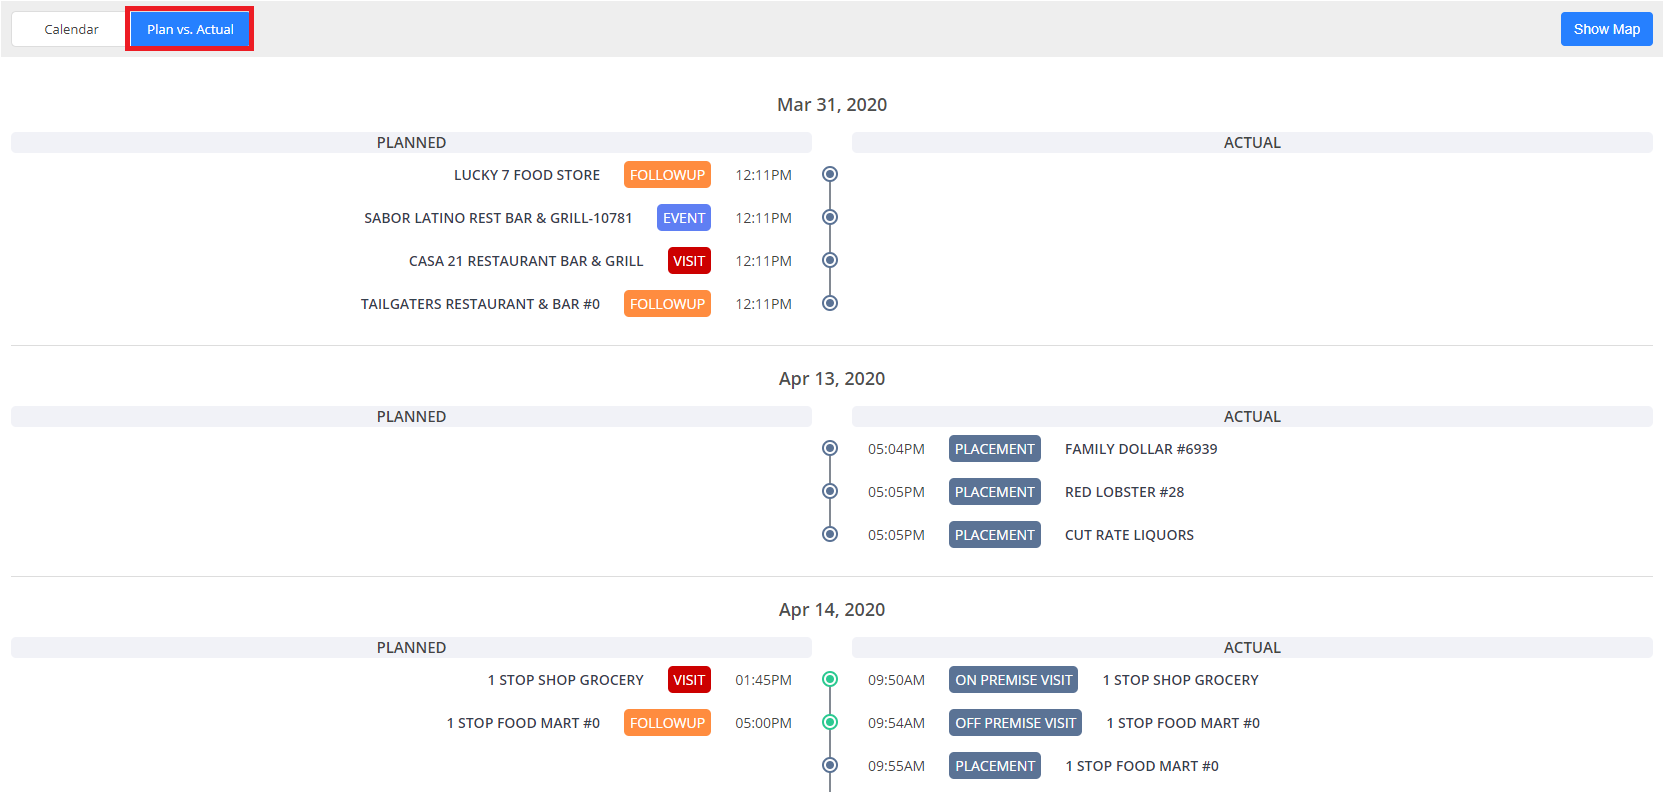
- Allows users a comparison view between scheduled planner items (Planned column) and completed market actions logged in Lilypad (Actual column)
- The circles in the middle will turn green when you execute a market action that was also a scheduled planner item.
- The "Show Map" or "Hide Map" button at the top right of the screen allows the user to show a map view of where each Planned vs. Actual account is located.
- Users can click one of the account pushpins from the map to see additional account information populate below the map screen.
Lists
.png)

The Lists tab in the Execute - Sidebar allows users to view all the list option features available in Lilypad (web equivalent of Blue Pushpin > Plan tab > My Lists in mobile).
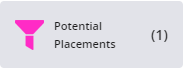
Potential Placements list shows accounts flagged by a user while completing activities and/or tasks OR that a user added directly to this list through the mobile app
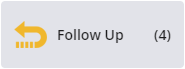
Follow Up list shows accounts a user flagged while completing activities and/or tasks OR that a user added directly to this list through the mobile app
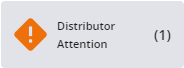
Distributor Attention list shows accounts a user flagged while completing activities and/or tasks OR that a user added directly to this list through the mobile app
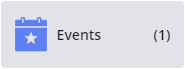
Events list shows accounts a user flagged while completing activities and/or tasks OR that a user added directly to this list through the mobile app
Target List(s) list shows accounts flagged by a manager/admin as high priority, or “target,” accounts for a user.
**NOTE: if you do not see any lists past “Events” this means that your manager/admin has not yet assigned a target list to you. If you do see additional lists (names will vary, but all will have a target icon to the left of the list name)
- The only way that accounts can be either added or removed from a target list is by a manager or admin on your organization’s Lilypad account, so it’s important to note that if you need any adjustments made you should reach out to your direct manager first.
Directly below the row of lists type options, you’ll see 3 tabs (defaulting to All Accounts) that allows you to view either All Accounts on this list, only Visited Accounts, or only the accounts that you have not yet logged visits at.

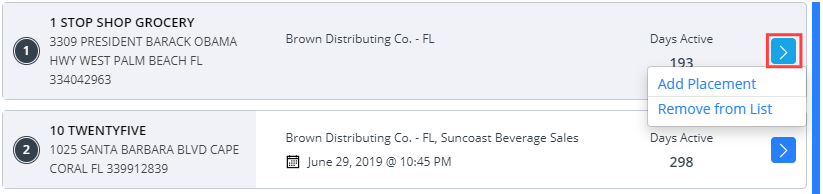
Below this you’ll find a list of accounts for each respective list type option. For each account, the list will display the account name, address, distributor, and Days Active (the number of days that the account has spent on the list).

If you click the blue arrow to the right of the Days Active, you can Add a Placement for the account or Remove from List.
Additionally, you’ll see the account highlighted on the map to the right side of the screen. Below that map, you’ll find additional details on the account: Overview, Contacts, Images, Attributes, Log, Sales, Sales Graph
In the top right corner of this list you’ll also find a toggle which defaults to “List” but also has a “Goals” option. If you click on goals, you’ll be able to view any goals that have been assigned to this specific target list and your progress towards completing those goals as well.
Incentives

The Incentives tab in the Execute - Sidebar allows a user to track their progress towards the incentives that a manager/admin has assigned to them in Lilypad.
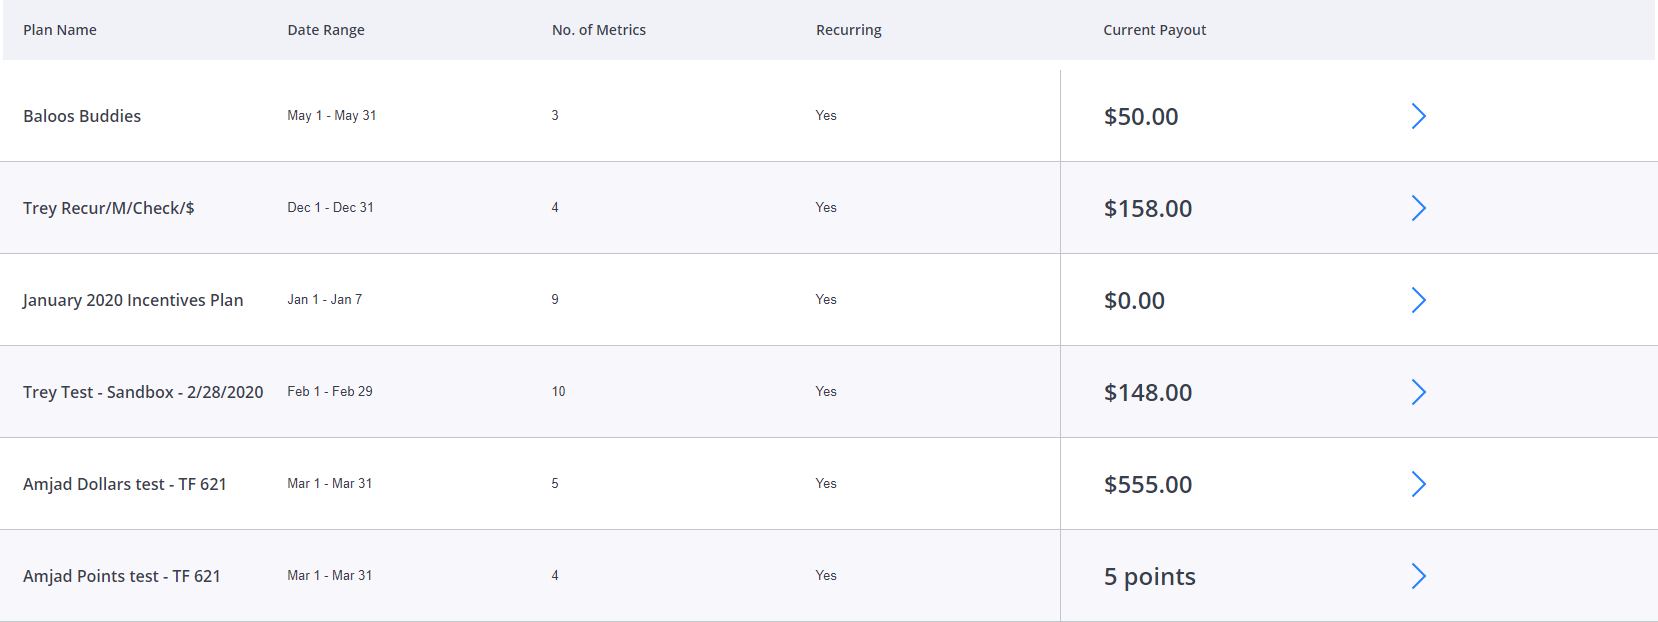
After clicking into the tab, a table of all the incentives your manager/admin has assigned to you will be visible. The info in the table will include: Plan Name, Date Range each plan is set for, Number of Metrics that make up the plan, whether or not the plan is Recurring, and what your Current Payout status is at (shown in either dollars or points, based on the incentive plan settings).
Users can click the blue arrow to the right of each payout amount to view additional details for each incentive plan:
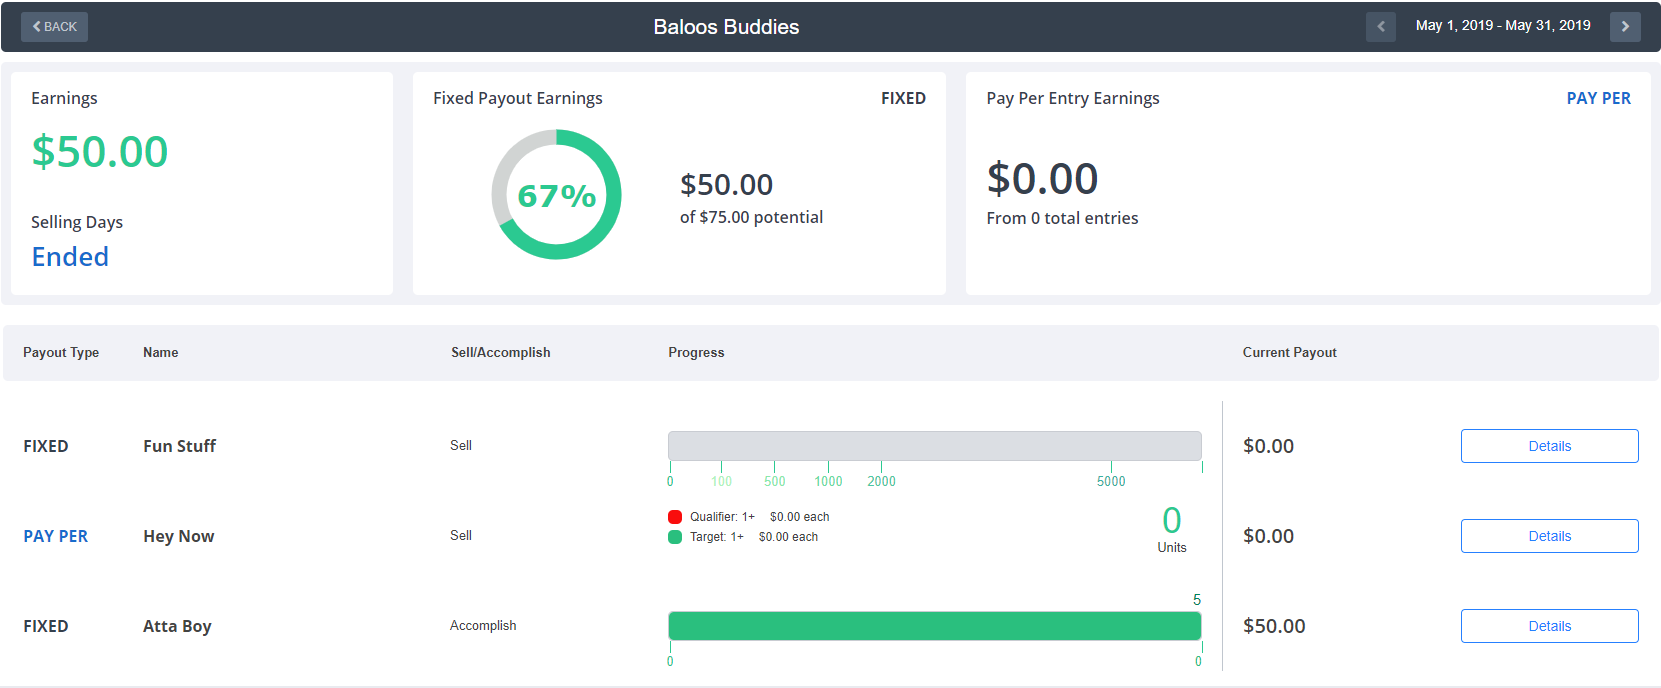
Earnings fields will show much you’ve earned so far from your incentive plan
- You’ll find the number of selling days left before the incentive plan ends at the bottom left of this window
- You’ll also see additional breakdowns based on whether the incentive metrics are tracking a fixed amount awarded once you accomplish the incentive or if you’re earning a certain payout for each entry made

Metric Statsfield will show high level details for each metric assigned to this incentive plan
- These stats will include Payout Type (fixed or pay per), Name of each metric, Sell or Accomplish (whether the metric is based on invoices received or activities/tasks logged), Progress (how close you are to hitting each metric), and Current Payout (how much each metric has contributed to your plans overall payout).
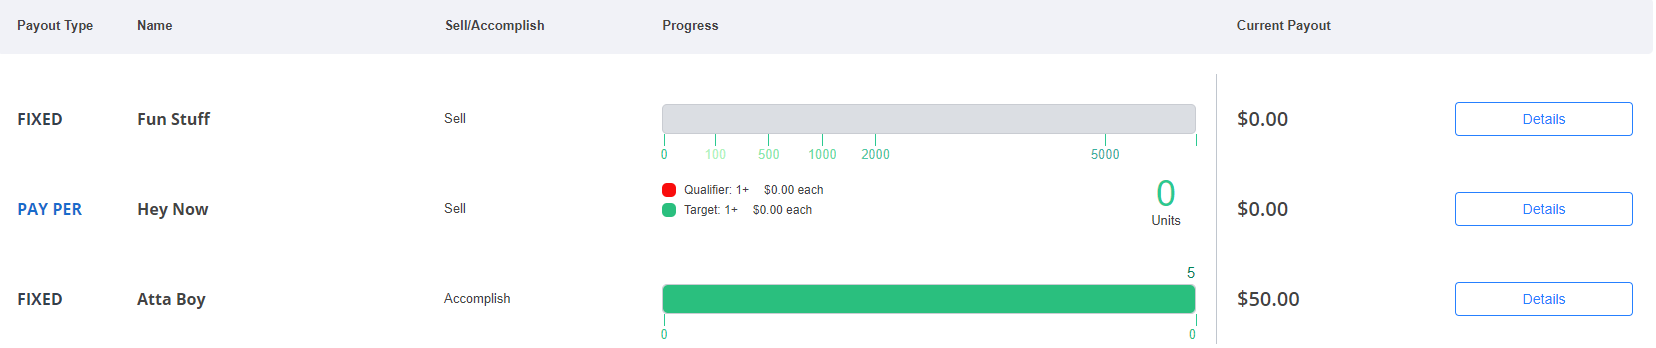
Details button (to the right of each metric payout amount) will show additional details for each metric. You'll be able to toggle between 2 views in this metric details pop up window: Progress Details and Overview
.png)
Progress Details will show a list of each log that has counted towards this specific metric to include:
- Value for the log,
- Account the log was entered at,
- account Address,
- Date entered and applied to metric,
- market Activity type (i.e. placement, on premise visit, display built, etc.)
.png) Overview will show info on this metric's specific settings such as:
Overview will show info on this metric's specific settings such as: - Payout Type (Fixed or Pay Per),
- Measurement - what the metric is measuring against (placements, on premise visits, displays built, etc.)
- Measured By - whether the metric is tracked by count (i.e. number of times a log is made) or by point (i.e. number of points earned from logging an activity, task, or placement)
- Accounts - whether accounts must be unique or allow repeat accounts was selected
- Payout Values
Goals

The Goals tab in the Execute - Sidebar allows a user to track their progress towards the goals that a manager/admin has assigned to them in Lilypad. (Web equivalent of Sidebar > Goals or Dashboard > Goals on mobile)
In this tab, you can track both General and Target List goals. They are differentiated below by their respective icons:

General Goals (tracked against your entire account universe)

Target List goals (tracked against only a specific target list)
Also visible on this tab, are the Goal Name and a Progress Bar that shows how close you are to completing each goal.
 As you work towards accomplishing your goal, the progress bar will fill in yellow
Once you reach or exceed your set target value, the progress bar will turn green
To the right of the progress bar, you can see:
- The Type classification of each goal, either Accomplish (tracked against activities and tasks logged) or Sell (tracked against confirmed sales in market).
- The Days Remaining column which lets you know how many days are left before that goal period ends
- The Date Range column which shows the overall duration of the assigned goal

If you click the Details button to the right side of date range, you’ll see a list of each Account that has counted towards this goal.
If you click the blue arrow to the right of the account name, you’ll be able to view the Date of each entry/sale, the Distributor responsible for the account, account Address. If this is a sell type goal, you'll also see the Product, Volume, and Units.


An eye icon will be visible for accomplish type goals.
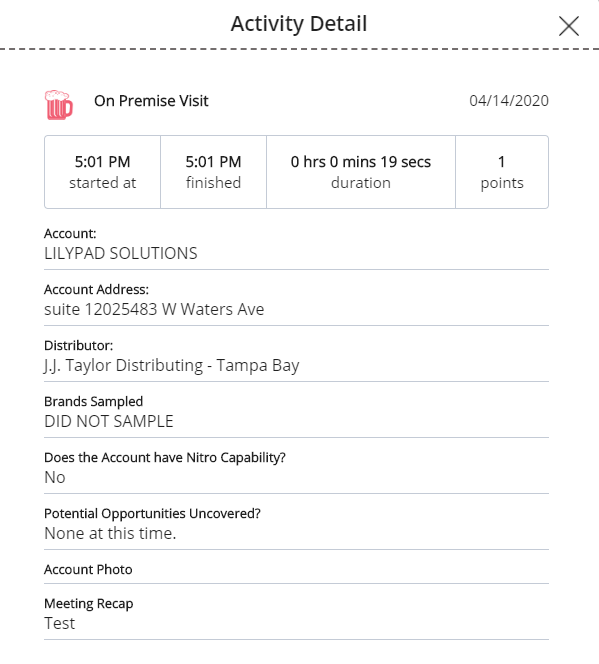
Click the eye icon to view a pop up window of an Activity Detail summary for each log entry that counted towards your goal from that account.
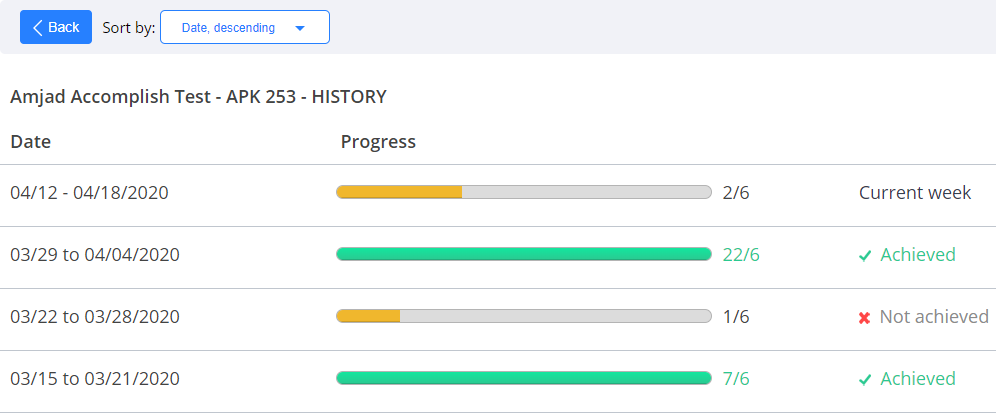
Additionally, back on the goals overview main screen, you can click the Goal History button (to the right of the Details button) to see your historical progress achievements towards each specific goal
Lastly, in the top right corner of the goals overview main screen, you'll see the Active and Archive button toggles:
- Active is the default option as those are the goals that are currently being tracked.
- Archive allows you to see previously achieved progress for goals that have since been deactivated.
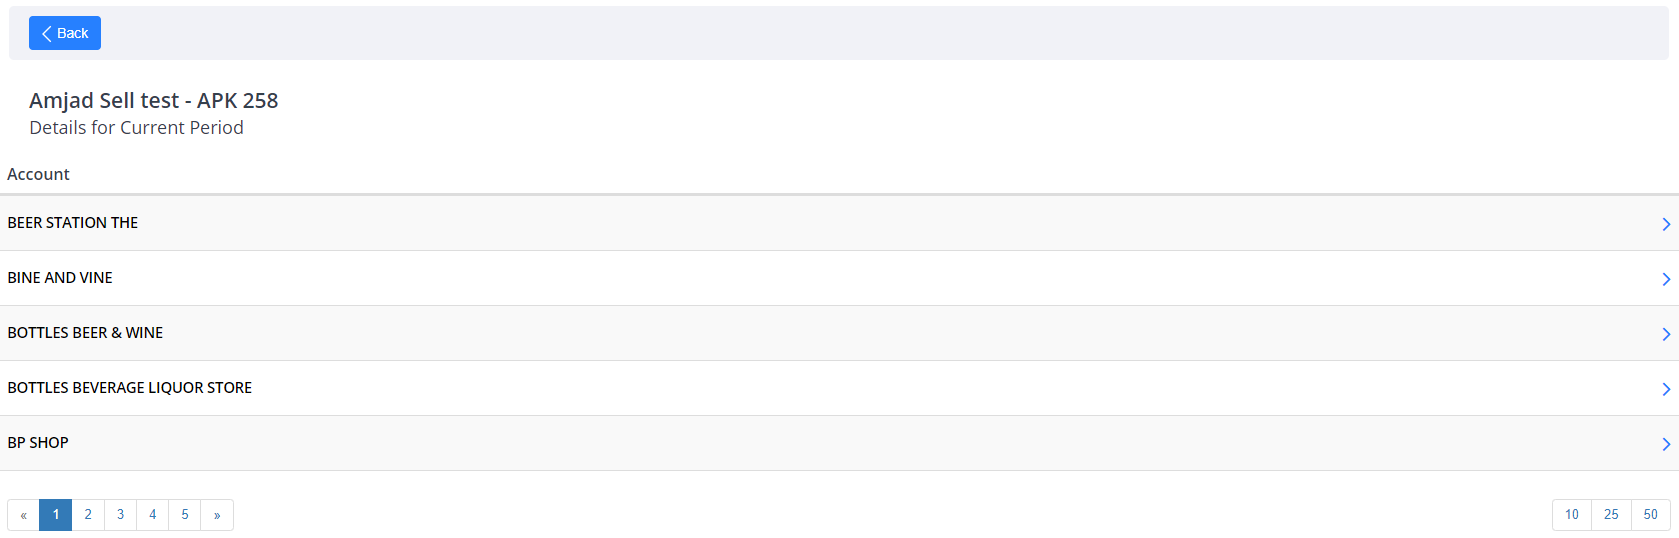
Accounts

The Accounts tabin the Execute - Sidebar allows a user to access their Org's entire account universe via the website. (Web equivalent of Blue pushpin > Accounts in mobile)
MAP VIEW
In the map view, you’ll see a large map that uses your current location toshow account pushpins of accounts that are near you.
**NOTE: If the map is pulling to an area that is not where you are currently located, you will need to adjust your location permissions for the Lilypad website in your browser’s settings page. Lilypad website is optimized for Google Chrome, you can find step by step instructions on how to turn on location permissions HERE (LINK DOCUMENT FOR OPTIMIZING WEB).
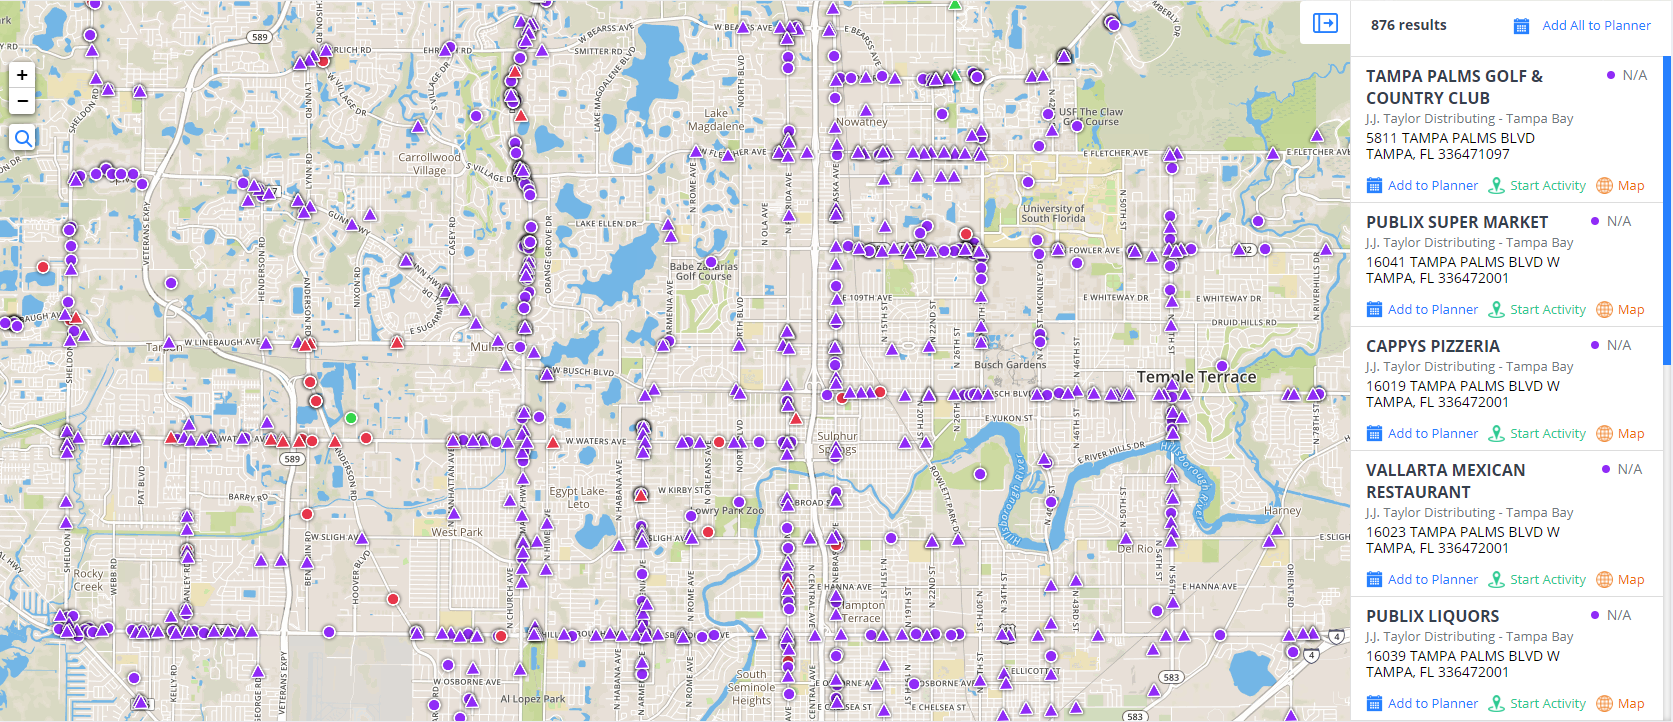
To the right of the account map, you'll see the accounts near you in list form. The accounts list will include the account name, address, and distributor. From the list, you can use the Add to Planner button (add a planner item for this account), Start Activity button (log a market action within the account), and the Map button (view exactly where on the map that account is located).
Above the map, you'll find 6 filter options to help narrow down on specific accounts. The filtering options include: Account Search, Distributors, Account Type, Activities, Attributes, and Sales.

- Account Search – allows a search for specific accounts by name or address
- Distributors – allows a search for accounts by narrowing down the Territory (assigned by your management team) accounts fall under, the Distributor responsible for servicing the accounts, the City (or cities) in which accounts are located, the Zip Code(s) in which accounts are located, or the Distributor Routes (if your distributor is providing that information to us) assigned to certain accounts
- Account Type – allows a search for accounts by filtering down to accounts that are classified as On Premise, Off Premise, Independent, or Chain
-
Activities– allows a search for accounts by the following criteria:
-
Account Activity–
- All accounts (whether activity has or has not been logged)
- Only accounts with activity (only accounts where you or another Lilypad user for your organization have logged an activity, task, or placement)
- Only accounts without activity (only accounts where nothing has ever been logged)
- Activity Time frame – The time frame in which activities have or have not been logged. You can select a preset options or scroll to the bottom of the drop down to create a custom time frame.
- Activity/Task Type – All accounts where a specific set of activities and/or tasks (On Premise Visit, Display Built, Menu Placement, etc.) have or have not yet been logged
-
Account Activity–
- Attributes – allows you to search for accounts based on specific traits such as Best Day to Visit, Best Time to Visit, Distributor Order Day, etc.
- Sales – allows you to search for accounts based on sales history. You can choose all buying accounts (Did buy), all non-buying accounts (Did not buy), or your top 10, 25, 50, or 100 buying accounts. You can also choose a specific date range (30-180 days or custom range), and even filter down to accounts that have or have not purchased specific brands and SKUs

On the left side of the map, you'll see buttons that overlay the map:


The magnifying glass button, allows you to jump to a specific location or area. For example, if I’m in New York City and I’d like to see accounts in Chicago, I would click that button and in the search bar that populates I would then type “Chicago, IL” and click enter – I would then be brought to the Chicago area and after the map screen completes loading I would be able to see all accounts in the Chicago area.
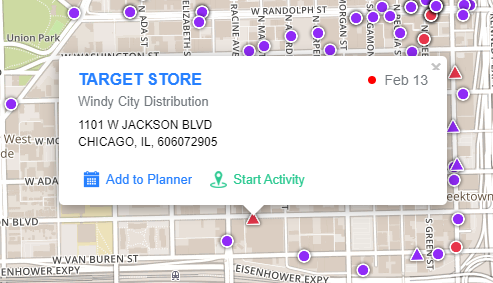
On the map, you can hover over a specific pushpin to see a pop up window of account info such as: account name, distributor responsible for the account, address, and in the top right corner, the last date of the most recent activity or task logged (if applicable). You can also use the Start an Activity button to complete a market action within the account (VIEW MORE HERE – LINK “HOW TO START ACTIVITY FROM ACCOUNT MAP ON WEB”) or the Add to Planner button to add a planner item for this account from this window (VIEW MORE HERE – BECKY LINK “HOW TO ADD ACCOUNT TO PLANNER FROM MAP ON WEB).
You can click on the pushpin to see a pop up window with additional account details such as:
- Notes – a place to view and add any general notes about the account
- Contacts – a place to view, add, edit, and delete account or (if applicable) distributor contacts
- Images – a place to view all photos that have been linked to this account
- Attributes – a place to view and set attributes for the account
- Log – a place to view details on all previously logged activities and tasks within the account
- Sales – a place to view a quick 30/60/90 day sales snapshot within the account
- Sales Graph – a graph that shows you this year’s sales trends within the account vs. the same period last year
You’ll also notice that, in the top left corner of this window, you can start an Activity or Task and add a placement to the account from here.
LIST VIEW
To the right of your filter options you’ll notice a toggle as well. This defaults to the classic pushpin view of the map (highlighted in blue) but if you’d like you can switch to a list view of the accounts you’re seeing. To do this, simply click on the button with the 3 horizontal lines directly next to the pushpin button.
In order to see the accounts on your map in this list view you’ll need to check the box towards the right side of your screen that says “Only show map accounts.”
You’ll also notice that you can choose which columns you’d like to view within the table of accounts by opening the drop down to the left of the Export button (located next to the only show map accounts checkbox).
If you’d like, you can also export this list of accounts by clicking the blue “Export” button. This will provide you with an immediate download of the list as an excel file.
Log Action
The Log Action button in the Execute - Sidebar allows a user to log an activity, task, or placement via the website.
**NOTE: If you do not see a Log Action button, this feature might not be enabled by your Organization. Contact your Organization's Lilypad Admin or email Lilypad support at lpsupport@fintech.com for confirmation.
To begin, click the Log Actionbutton located towards the top right corner of the screen.

Next, the Start an Activity, Task, or Placement window will appear for you to choose the type of log entry you'd like to make.
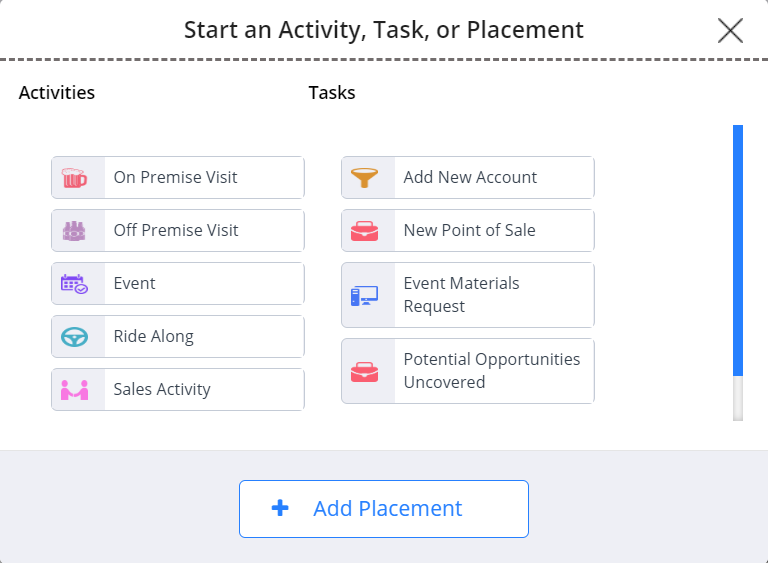
Activity/Task
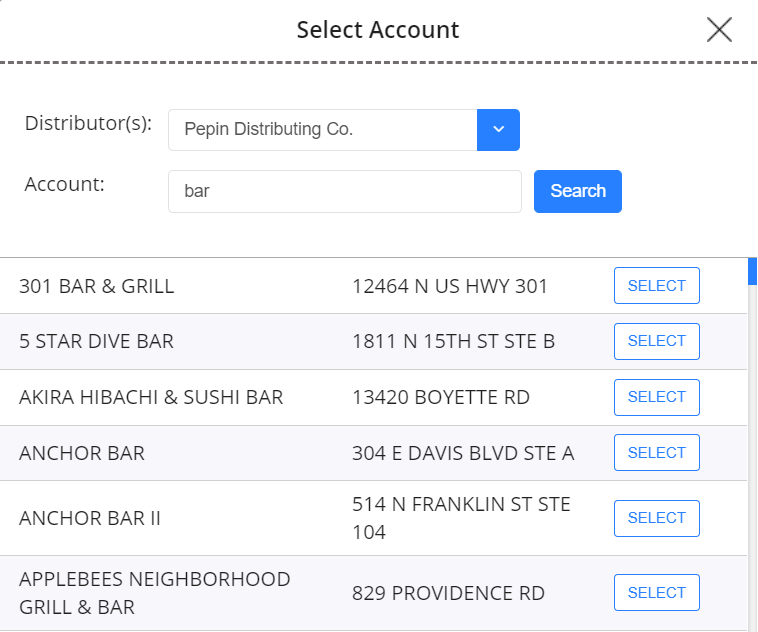
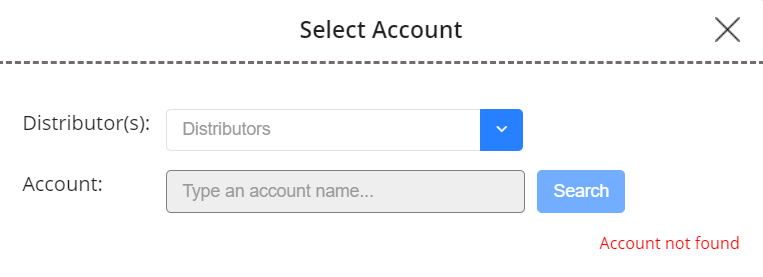
If this is an Activity or Task that requires an account to be tied to it, the Select Account window will appear.
In this window, you'll use the drop down to choose the Distributor who is responsible for the account, then search for the specific account by name or address.
In the list that populates, find the account you’re going to log under, then click the Select button to the right of the account name and address to begin logging your entry.
**NOTE: While certain Activities or Tasks do not require an account tie in order to complete them, logging Placements will always require an Account to be tied to it.
Depending on what you previously selected, the next window to appear will be to either complete an Activity/Task entry or Placement entry
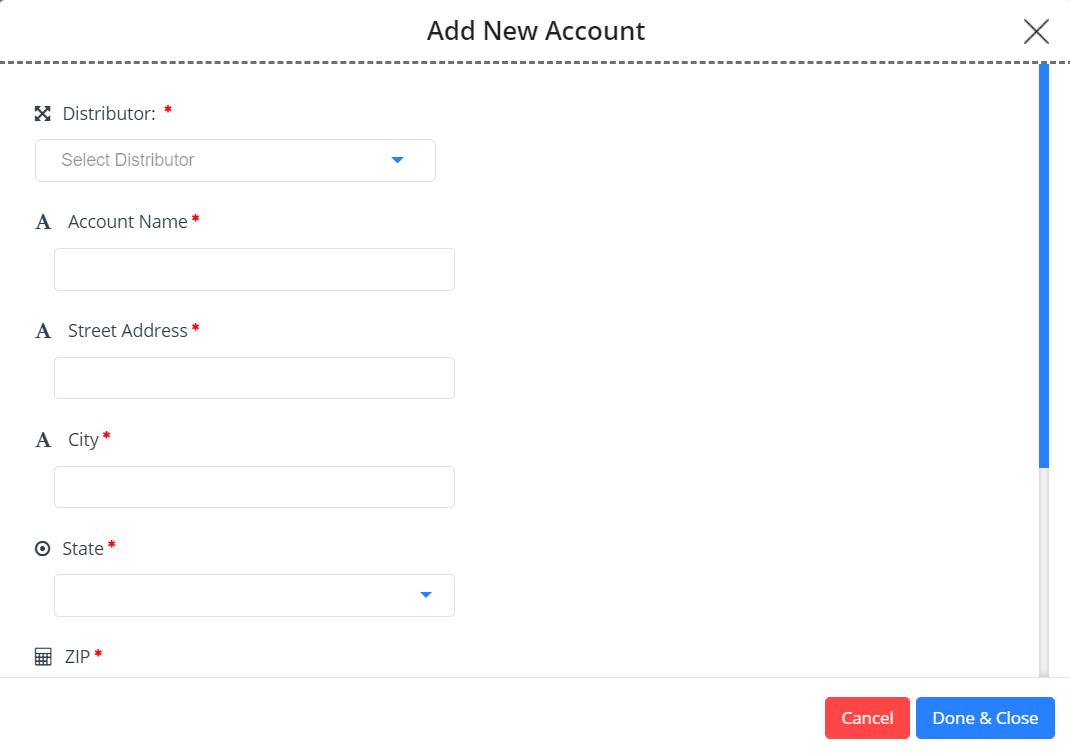
If you can’t find the account you’re looking to log an entry at, you can instead click the red Account Not Found button.
**NOTE: If an account is not yet being reported by your Distributor through VIP, then it will not populate as an option in Lilypad. You can use the Account Not Found feature to manually create an account in the Lilypad system for you to log your entries and notes; however, no sales data will flow to that manually created account. Once your Distributor starts reporting on that account, Lilypad will be able to merge your manually created account with the account that's now being reported with sales data from VIP.
The Add New Account pop window will appear, then you'll need to enter the relevant info regarding the account such as: Distributor responsible for the account, Account Name, Account Address, City, State, and Zip Code the account is located in, and if it is an On Premise or Off Premise account. When you're finished, click the Done & Close button in the bottom right corner of the window.
Enter an Account Contact
If it has not already populated, enter a Distributor Contact
Set the date, time, and duration for your entry
Fill out all applicable questions, paying special attention to any field that has a red asterisk at the end – this denotes that the field is required and must be filled out before you are able to complete the activity/task

If needed, flag the account for any of the following:
Potential Placement – i.e. a market lead, they’re interested in bringing your brand in but have not given a hard verbal commitment yet
Follow Up – a way to add the account as a follow up on your Lilypad calendar
Distributor Attention – a way to indicate that there is something going on within the account that requires a response or follow up from the distributor

To complete the activity/task, choose one of the following options:
Done – this will log the activity and take you back to your previous screen
Done & Share – this will log the activity and allow you to send an email recap to whoever you deem necessary

IF YOU ARE ENTERING A PLACEMENT: Choose the Add Placement button at the bottom of the window
Search for the account you’d like to log the placement at
Enter the contact information for who at the account approved (Approved by:) the commitment
Enter the distributor contact information if it has not already populated
Indicate whether the account is committing to a Package or Draft SKU
Choose the specific SKU they are committing to
Enter the number of units the account is committing to
Choose a promised by date (i.e. the date by which you would expect the product to have landed in the account)
If needed, add notes about the placement
If the account is committing to multiple SKUs you can click the blue Add More button at the bottom of the window, which will allow you to add as many SKUs as needed under a single placement

Once all necessary information has been added you can choose one of the following options:
Done & Save – Logs the placement and takes you to your previous screen

Done & Share – Logs the placement and allows you to then send an email recap to whoever you deem necessary before taking you back to your previous screen