The Log Action button in the Execute - Sidebar allows a user to log an Activity, Task, or Placement via the website.
**NOTE: If you do not see the "Log Action" button, this feature might not be enabled by your organization. Contact your organization's Lilypad Admin or email Lilypad support at [email protected] for confirmation.
To begin, you'll click the Log Action button located towards the top right corner of the screen.

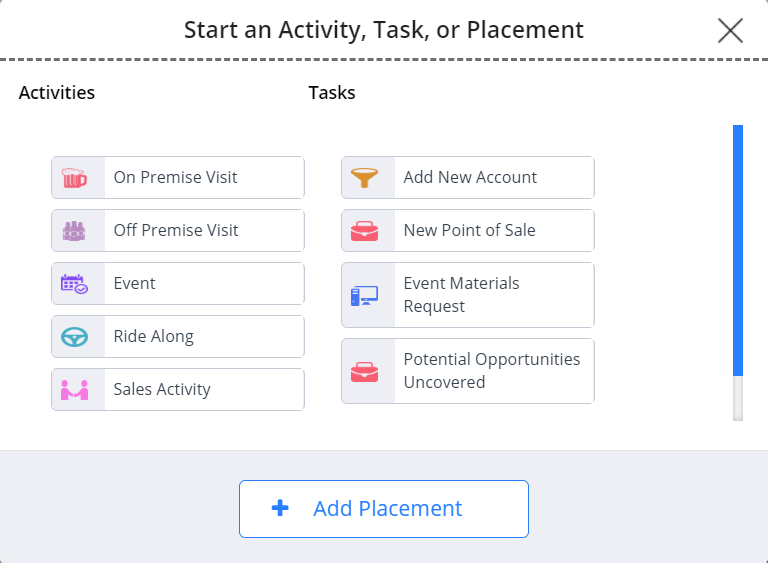
Start an Activity, Task, or Placement window
Next, the Start an Activity, Task, or Placement window will appear for you to choose the type of log entry, or market action (Activity, Task, or Placement), you'd like to make.
Select Account window
If this is an Activity or Task that requires an account to be tied to it, a Select Account window will appear.
**NOTE: While certain Activities or Tasks will not require an account tie, Placements will always require an Account to be tied to it.
Once you're on the Select Account window, you'll use the drop down to choose the Distributor whose account universe you want to access and search through.
Below the drop down, use the Account text box to type a name or address of an account, then click the Search button.
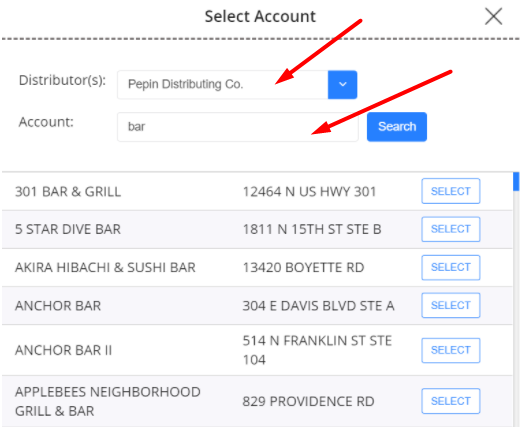
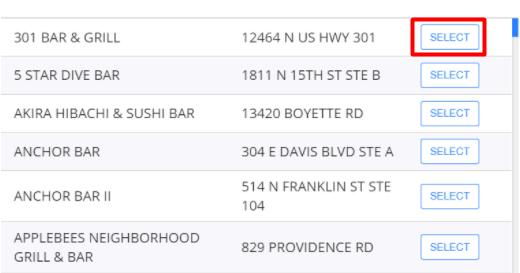
In the list that populates, find the account you want to log your market action under, then click the Select button located to the right of the account name and address.
Market Actions & Account Details window
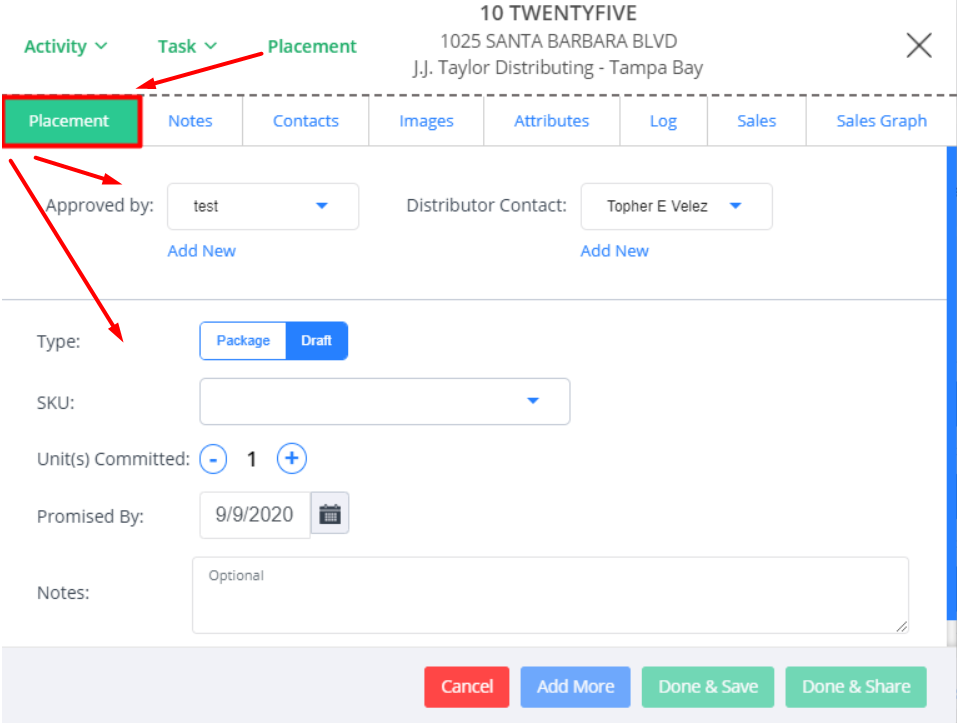
Depending on what market action (Activity, Task, Placement) you previously selected, the next window will open up with a specific tab (highlighted in green) to complete either that Activity, Task, or Placement entry.
In our example below, we had previously selected Placement so you can see that's the tab that opened up for us.
Market Action Options
Although the Market Actions & Account Details window automatically opens a tab based on the previously selected market action you chose from the Start an Activity, Task, or Placement window, you still choose and complete other market actions from this window by using their respective options located in the top left.

Each market action you choose will open a separate tab. As depicted below, you can have all these open at once and switch between them.
The tab you're currently in will be highlighted green to indicate that's the particular market action you're working on.

Completing a Placements Entry
The Placements feature is how you enter and give yourself credit for all the verbal commitments you receive from buyers while out in the market.
You can then track those placements through Lilypad's Placement Tracker (Funnel) feature (see our placements tracker article for additional details on this feature).
**NOTE: Since Lilypad uses the data connection that's setup for your Organization for the Placements feature, this feature might may not be available to you if you don't have data connection setup with us. Check with your Organization's Lilypad Admin or email our support team at [email protected] to confirm whether there is a data connection that would allow you to use this feature.
For many of our features and functions, the web app works the same as our mobile app. The same is true for adding placements (see our Placements - tab (mobile) article for reference).
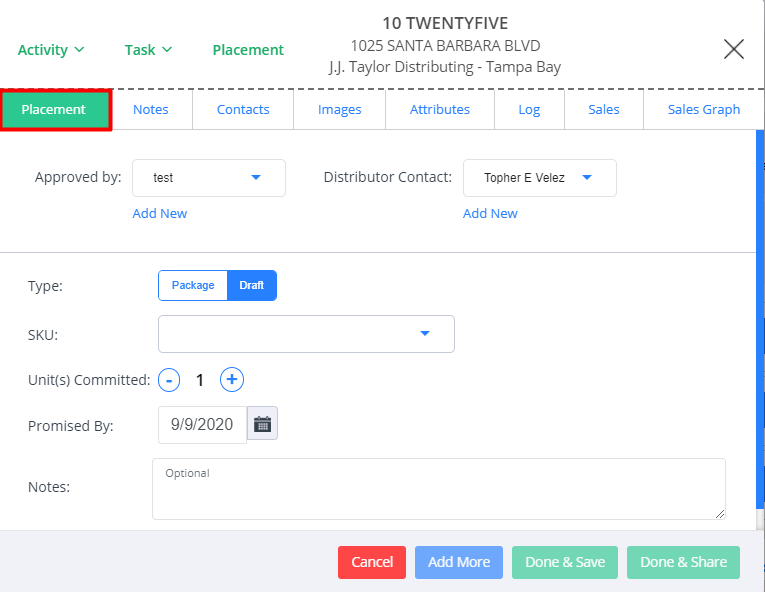
Once you have the Placement tab open in the Market Actions and Account Details window, simply select and enter the relevant information.
We broke down the general entering/logging process for you below.
1 Enter the Approved By (account contact) information and the Distributor contact information.
2 Click either Package or Draft depending on the type of Placement being made.
3 Click the drop down to choose the the relevant SKU **NOTE: SKU options are based on the product list being sent to Lilypad. If you do not see certain SKUs contact your Lilypad Admin or email [email protected] to confirm the most up to date list is being sent.
4 Select the number of Unit(s) Committed by using the plus and minus buttons.
5 Set a Promise By date. If you believe there might be some sort of delay (either with the distributor or warehouse stock issues, etc.) with the product landing in the account, this is meant to be used to indicate the day you think the product should arrive. **NOTE: We recommend only setting a future Promise By date if a known delay exists, otherwise just enter the same date you're entering the placement in Lilypad. The preset time frames for each of the categories in the Placement Tracker (Funnel) should provide enough time to adequately track each placement (for more details on placement categories and time frames, click here).
6 Add any Notes (optional), if there's anything unique you need to note about the placement.
7 Click the Add More button in the bottom of the window, if the account is committing to additional SKUs, then repeat steps 1-6.
8 Once all SKUs have been entered, click either Done & Save (logs the placement in Lilypad immediately) or Done & Share (Logs the placement in Lilypad and auto-generates an email that can be shared with your management team and/or distributor)
Completing an Activity/Task Entry
As with adding placements, logging an Activity or Task in the Lilypad web app is the same as in the mobile app (see our Activity - tab (mobile) article for reference).
Once you have the Activity or Task tab open in the Market Actions and Account Details window, you just need to enter the relevant contact information and scroll through to answer the survey questions in each field.
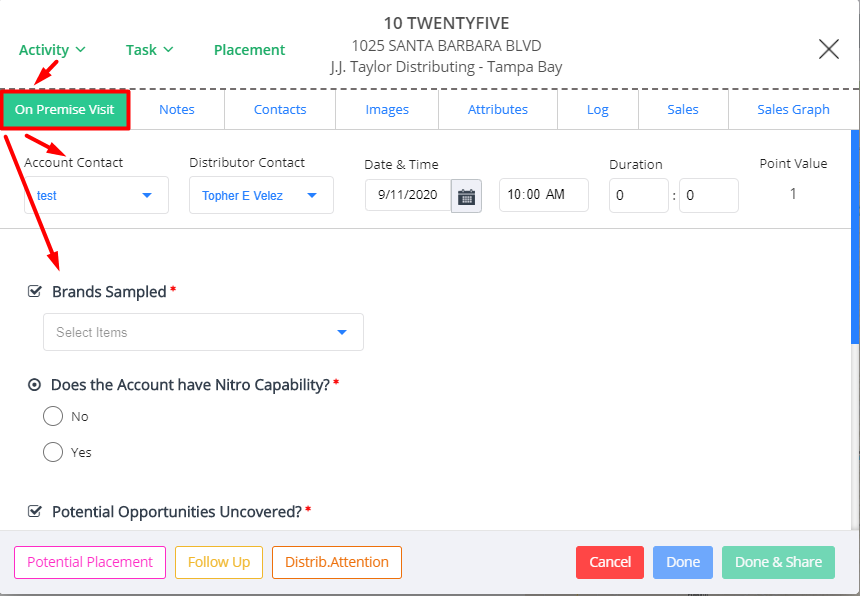
Keep in mind that each Activity or Task is created by your organization's Lilypad Admin/Managers, so they will not always look the same. They can, and often times will, have different questions and response options available for you to choose from.
Required fields
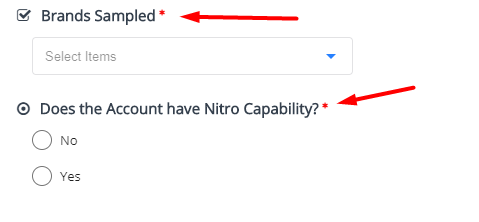
Your organization's Lilypad Admins/Managers can also set certain survey questions as Required fields which are denoted by an asterisk (*) at the end of the field title. These asterisked fields must be filled out in order to complete the Activity or Task.
Account Flag Options
Towards the bottom left of the window you'll notice 3 different colored buttons: Potential Placement, Follow Up, Distrib. Attention.
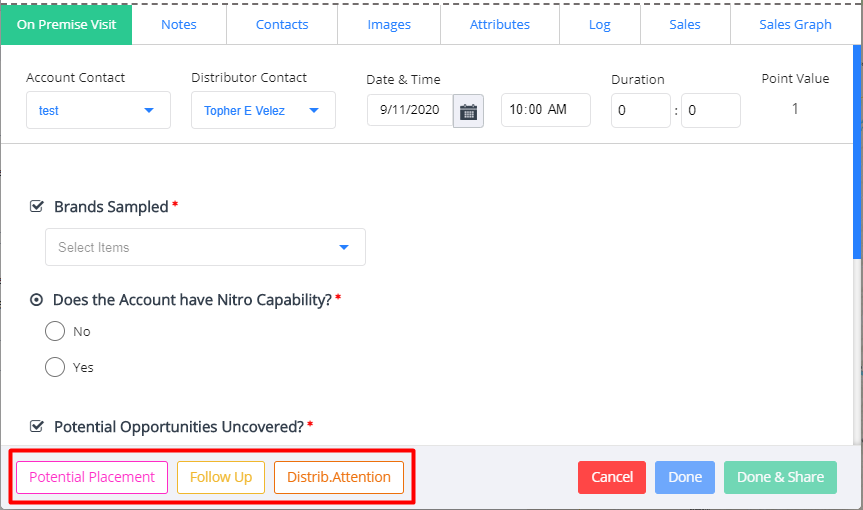
These are your Account Flag options that can be used as indicators of issues that need to be addressed or serve as reminders of outstanding items you need to take care of at an account.
Below we've outlined each flag and their respective uses for you:
Potential Placement flag
The Potential Placement flag is meant to serve as a way to identify and note accounts that are potential commitment leads for you out in the market.
Clicking the button opens up a Add a Note pop up window where you can leave yourself a note with whatever relevant information you'd like about that account and why it might be a lead.
Once flagged, each account will populate and be accessible to you in your Potential Placements list located in both your mobile app Plan tab and web app Lists tab (see our Plan -Tab (mobile) and Lists - Tab (web) articles for more details on the list feature and how to access it from either location).
**NOTE: This flag would be useful in situations where a buyer might be interested but just unable to bring your product on at the moment (due to having a similar product on the shelf or on tap) but requests you check back in with them in a couple weeks.
Follow Up flag
The Follow Up flag allows you to immediately add a planner item to your Lilypad calendar for a follow up visit to an account without having to leave the Activity or Task.
Clicking the button opens up a Add Planner Item pop up window for you to enter all the relevant information and notes.
**NOTE: This flag is especially useful for situations like the one mentioned above where the buyer was interested and requested you return in a couple weeks.
Distrib. Attention flag
The Distrib. Attention flag should be used to indicate distributor specific actions items that need to be completed at an account.
Clicking the button opens up a Add a Note pop up window where you can enter notes of any relevant information for you or the Distributor rep.
Once flagged, all the accounts and your notes of what's needed will appear in a Action Items column in an interactive Market/Distributor Recap Report that you're able to pull from Lilypad and send directly to your Distributors (see our Recaps - Sidebar (web) and Reports - Sidebar (mobile) articles for more details on how to access and use this feature from both the web and mobile app)
Additionally, each of the accounts will populate and be accessible to you in your Distributor Attention list located in both your mobile app Plan tab and web app Lists tab (see our Plan -Tab (mobile) and Lists - Tab (web) articles for more details on this list feature and how to access it from either location).
**NOTE: Some examples of distirbutor specific actions items include tap lines needing to be cleaned, out of code product on the shelf, POS item that needs to delivered, etc.
Done Options
Once you've entered and answered everything in your survey, you'll use the Done options located at the bottom right of the window in order to finalize logging that entry into Lilypad.
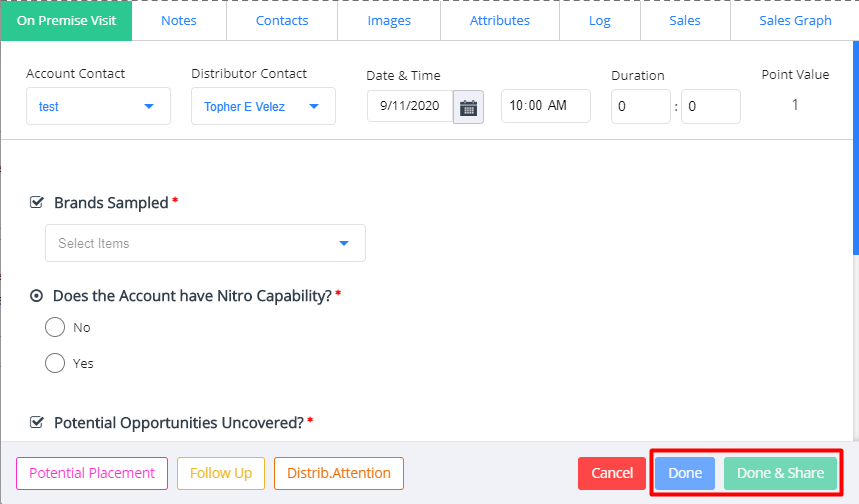
Done button
Done button: logs the Activity or Task and closes that tab. If you had any other market action tabs open, you will be redirected to that next tab.
Done and Share button
Done and Share button: logs the Activity while additionally auto-generating an e-mail recap of the information just entered in the Activity survey that can be shared with your management team and/or distributor. If you had any other market action tabs open, you will be redirected to that next tab.
Account Detail (Profile) Tabs
In addition to being able to log market actions (Activity, Task, or Placement) from the Market Action and Account Details window, you also have access to 7 separate blue tabs you can reference that breakdown additional information or Account Details for the account you're entering the market action(s) at.
The information in these tabs will either have been previously entered (when you or someone in your Organization has been in that account before) or will be able to be newly entered (when you're the first person in your Organization to be in that account).
Below we've outlined each of the 7 tabs and their respective uses for you.
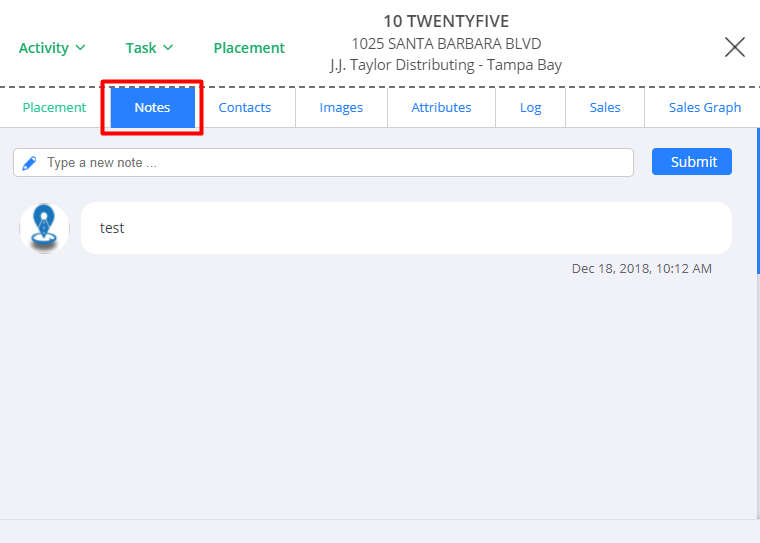
Notes Tab
Notes tab: where you can view and enter general notes about the account. These notes will be visible to you and anyone else who might enter this account in the future. (web equivalent of the Account details > Info > Notes section in the mobile app).
Contacts Tab
Contacts tab : where you can view, add, edit, and delete account and distributor contacts (web equivalent of the account details > contacts tab in the mobile app).

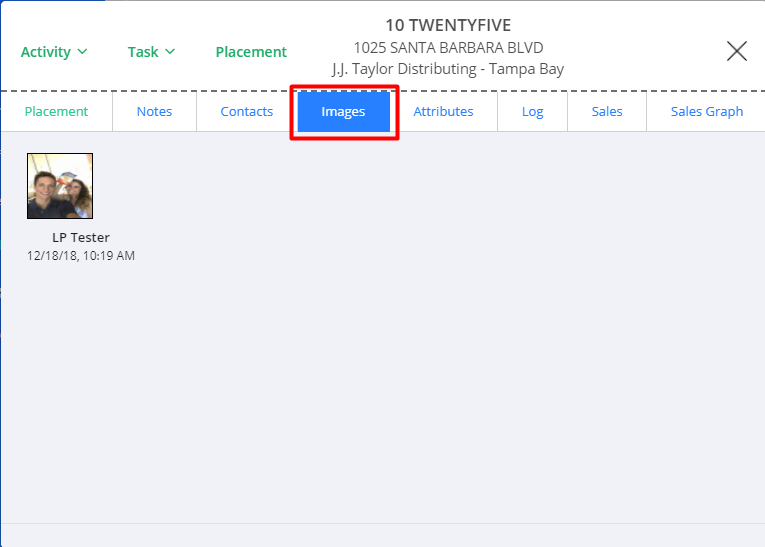
Images Tab
Images tab : where you can view all photos that have been tied to this account previously (web equivalent of the photos shown under account details > info in the mobile app)
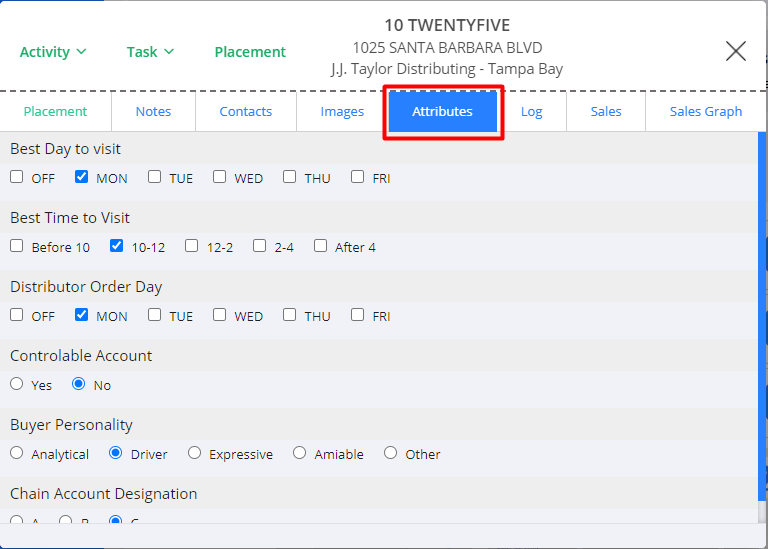
Attributes Tab
Attributes tab: where you can view and set any attributes that apply to this account (web equivalent of the account details > attributes tab in the mobile app).
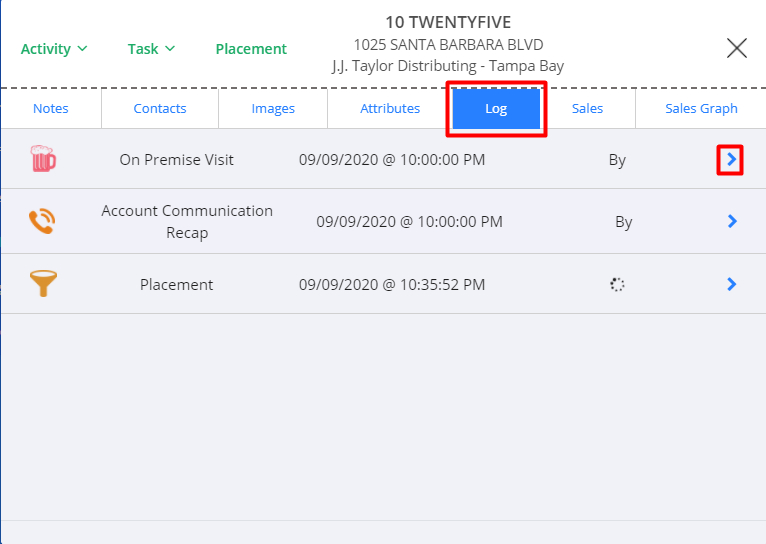
 Log Tab
Log tab: where you can see all previously logged activities, tasks, and placements for this account. You can also click on the arrow to the right of a specific log, to view details from that specific entry (web equivalent of the account details > log tab in the mobile app).
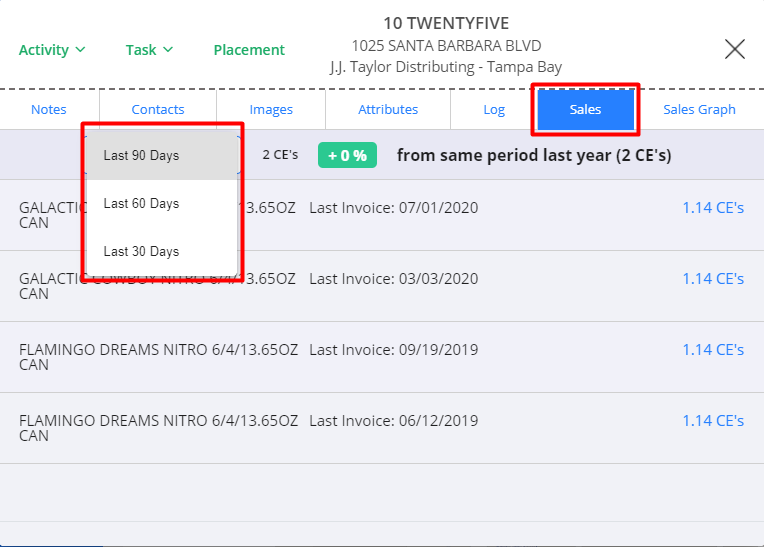
Sales Tab
Sales tab: where you can view a 30, 60, or 90 day sales snapshot for all invoices reported to Lilypad for that particular account (web equivalent of the account details > sales tab in the mobile app).
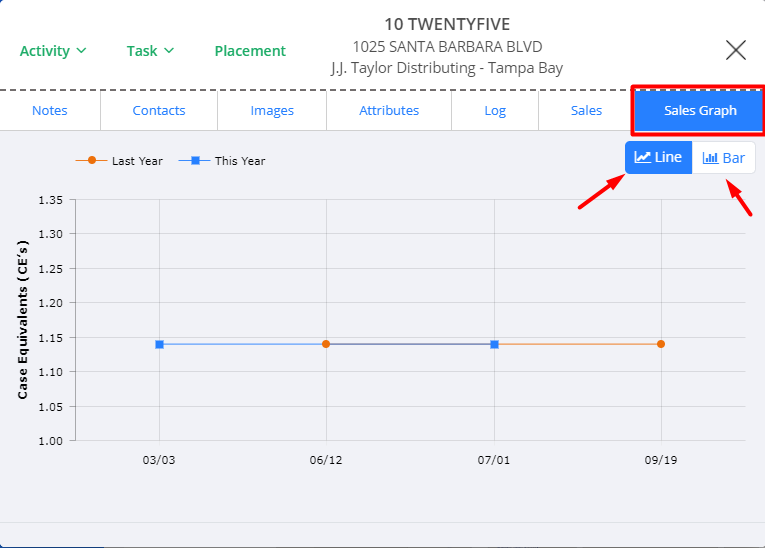
Sales Graph Tab
Sales Graph tab: where you can view a graph that outlines sales data for all days on which Lilypad received invoices for that particular account with a comparison of this year (blue line) and last year (orange line). The default view is a line graph but you can click the toggle to see it as a bar graph too. (web equivalent of the account details > sales tab in the mobile app).