The Accounts tab in the Execute - Sidebar allows you to access your Org's entire account universe via the website. (Web equivalent of Blue pushpin > Accounts in mobile)
Map View/Functions
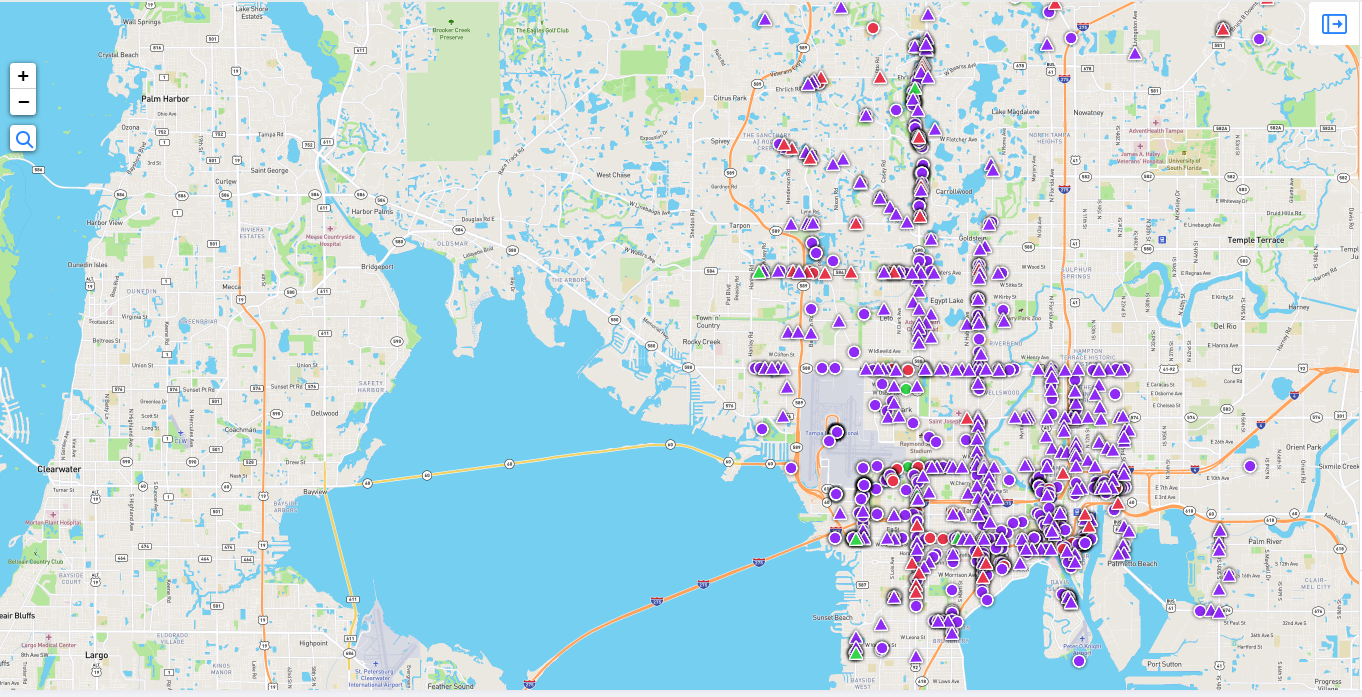
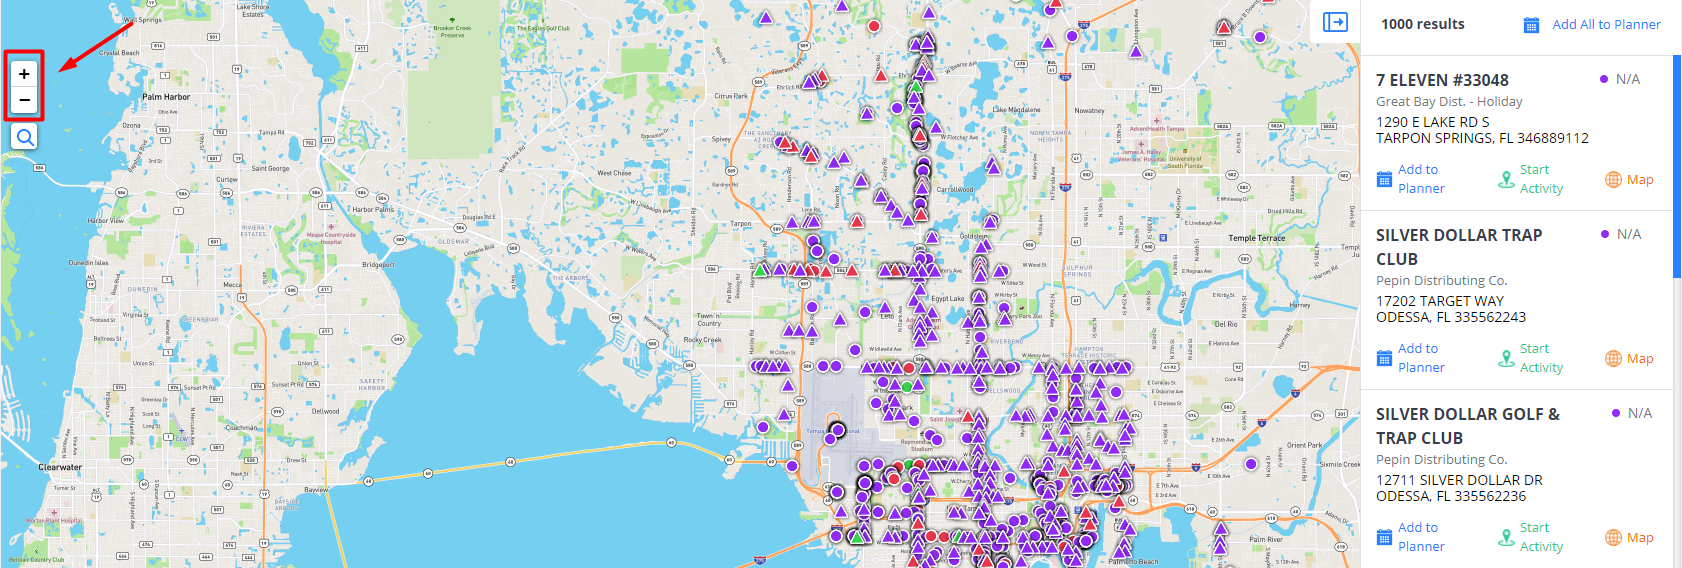
The Map view is the default view that will populate whenever you click on the Accounts tab. In the Map view, you’ll see a large map that uses your current location to show different colored pushpins of accounts that are nearest you.
**NOTE: If the map is pulling to an area you are not currently located, you will need to adjust your location permissions for the Lilypad website in your browser’s settings page.
Account Activity Colors
The color designation of each of the pushpin are based on Lilypad's Account Activity classification.
The Account Activity Colors help serve as a quick visual indicator of if/when the last market action (Activity, Task, or Placement) was completed at that account.
Below is a breakdown of the color designations for you:
Color Designations
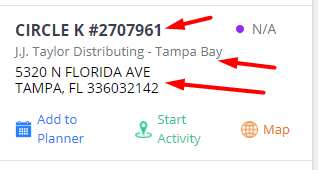
Purple (Total Market): Indicates that since your Organization began with Lilypad, no market actions (Activity, Task, or Placement) has been logged at that account.
Green (Ongoing Activity): Indicates that a market action (Activity, Task, or Placement) was logged within the last 30 days.
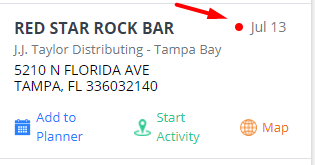
Red (Aging Activity): Indicates that it has been over 30 days since a market action (Activity, Task, or Placement) was logged at that account.
Pushpin Pop Up Window
If you hover over a pushpin with your cursor, an informational pop up window will appear.
This window displays minor "at a glance" information for that particular account like the account name, address, and distributor.
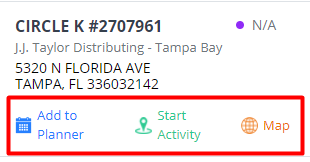
Additionally, this window will allow you to quickly create a planner item by clicking Add to Planner or log and complete an Activity or Task by clicking Start Activity.
Map Maneuvering
To maneuver around the map, just click and drag your cursor in the direction you'd like to go. Sort of like a drag and drop function.
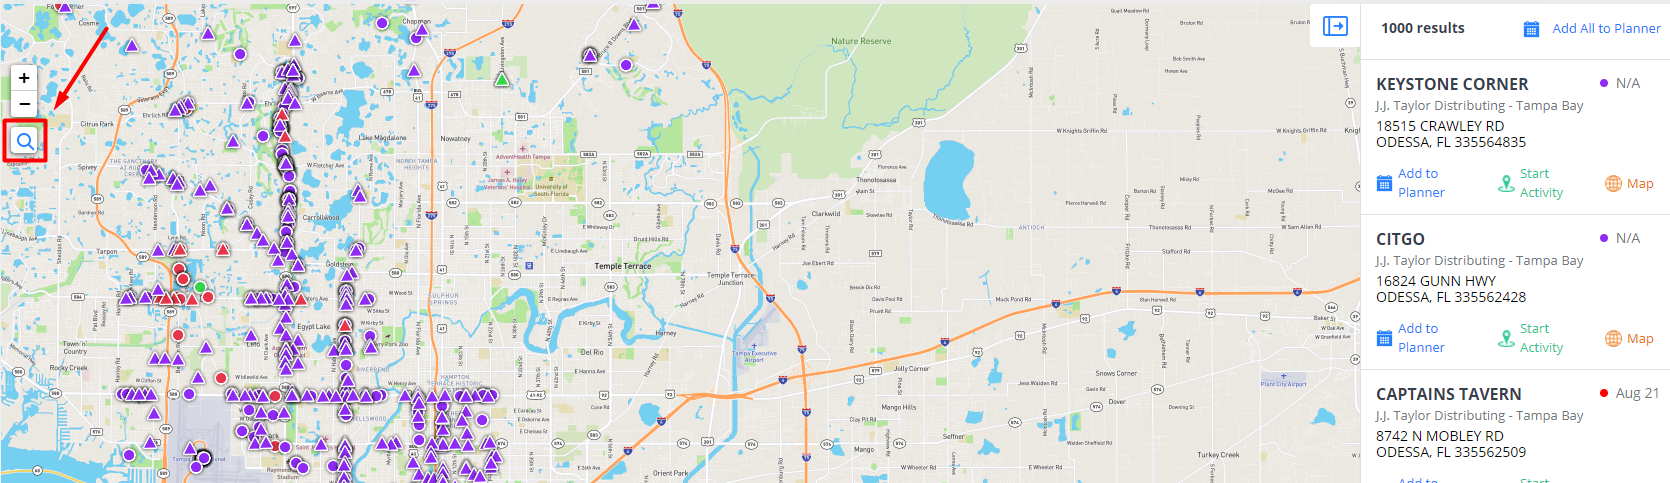
Magnify Glass Button
You can use the magnify glass button that overlays the map on the left, for a quicker or more specific location/area jump.
For example, if you're in New York City and would like to see accounts in Chicago, you can click the magnify glass and type "Chicago, IL" in the search bar that populates and hit enter, then you'd be brought to the Chicago area and be able to see all the available accounts in that area.
Plus and Minus Buttons
Right above the magnify glass, you'll see the plus and minus buttons. You can use these to zoom in or out on the map.
Similarly, the scroll wheel on your mouse serves the same zooming function as long is as your cursor is on the map.
Map Filter Options
Above the map, you'll find 6 main filter options to help narrow down on specific accounts. The filtering options include: Account Search, Distributors, Account Type, Activities, Attributes, and Sales.

Account Search
This simply allows you to use the search bar to look for specific accounts by name and address.
Distributors filter
This filter allows you to search for accounts by narrowing down by the Territory (assigned by your management team) accounts fall under, the Distributor responsible for servicing the accounts, the City (or cities) in which accounts are located, the Zip Code(s) in which accounts are located, or the Distributor Routes (if your distributor is providing that information to us) assigned to certain accounts

Account Type filter
This filter allows you to search for accounts by filtering down to accounts that are classified as On Premise, Off Premise, Independent, or Chain

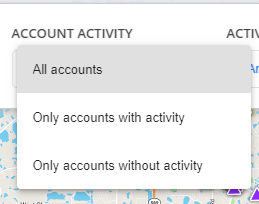
Activities filter
This filter allows you to search for accounts by the following activity criteria:

Account Activity -
All accounts (whether activity has or has not been logged)
Only accounts with activity (only accounts where you or another Lilypad user for your organization has logged an Activity, Task, or Placement)
Only accounts without activity (only accounts where nothing has ever been logged)
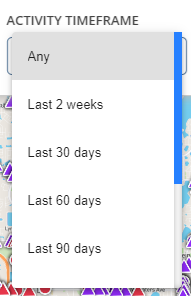
Activity Time Frame - The time frame in which activities have or have not been logged. **NOTE: You can select a preset option or scroll to the bottom of the drop down to create a custom time frame
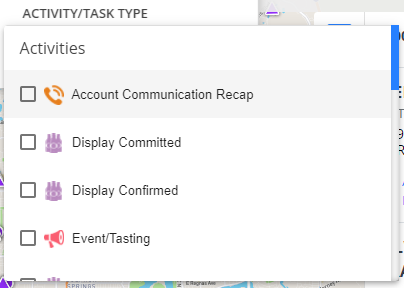
Activity/Task Type - All accounts where a specific set of Activities and/or Tasks (On Premise Visit, Display Built, Menu Placement, etc.) have or have not yet been logged. **NOTE: You can choose multiple Activities/Tasks by checking the box of each one you'd like to filter your search for.
Attributes filter
This filter allows you to search for accounts based on specific traits such as Best Day to Visit, Best Time to Visit, Distributor Order Day, etc. **NOTE: Account attributes are manually entered/set for each individual account by you or another Lilypad user in your organization. This filter will only work for the accounts attributes were entered at.

Class of Trade filter
This filter allows you to search for accounts by business type. If an account does not have a Class of Trade assigned to it, it will show as "UNASSIGNED." UNASSIGNED is also an option in the Class of Trade filter dropdown.
*NOTE #1: Class of Trade map filter and account profile tags appear for clients who only use Cloud data connections or VIP.
*NOTE #2: You're unable to edit an account's Class of Trade since it pulls from account data ingestion.


Sales filter
This filter allows you to search for accounts based on sales history.
You can choose between Did buy (all buying accounts), Did not buy (all non-buying accounts), or your top 10, 25, 50, or 100 buying accounts.
You can also choose a specific date range (30-365 days, YTD, or custom range), and even filter down to accounts that have or have not purchased specific Brands and SKUs.
New PODs (Points of Distribution) are accounts that recently purchased your products but didn't buy your products further in the past.
Lost PODs are accounts that used to buy your products in the past but recently stopped buying your products.


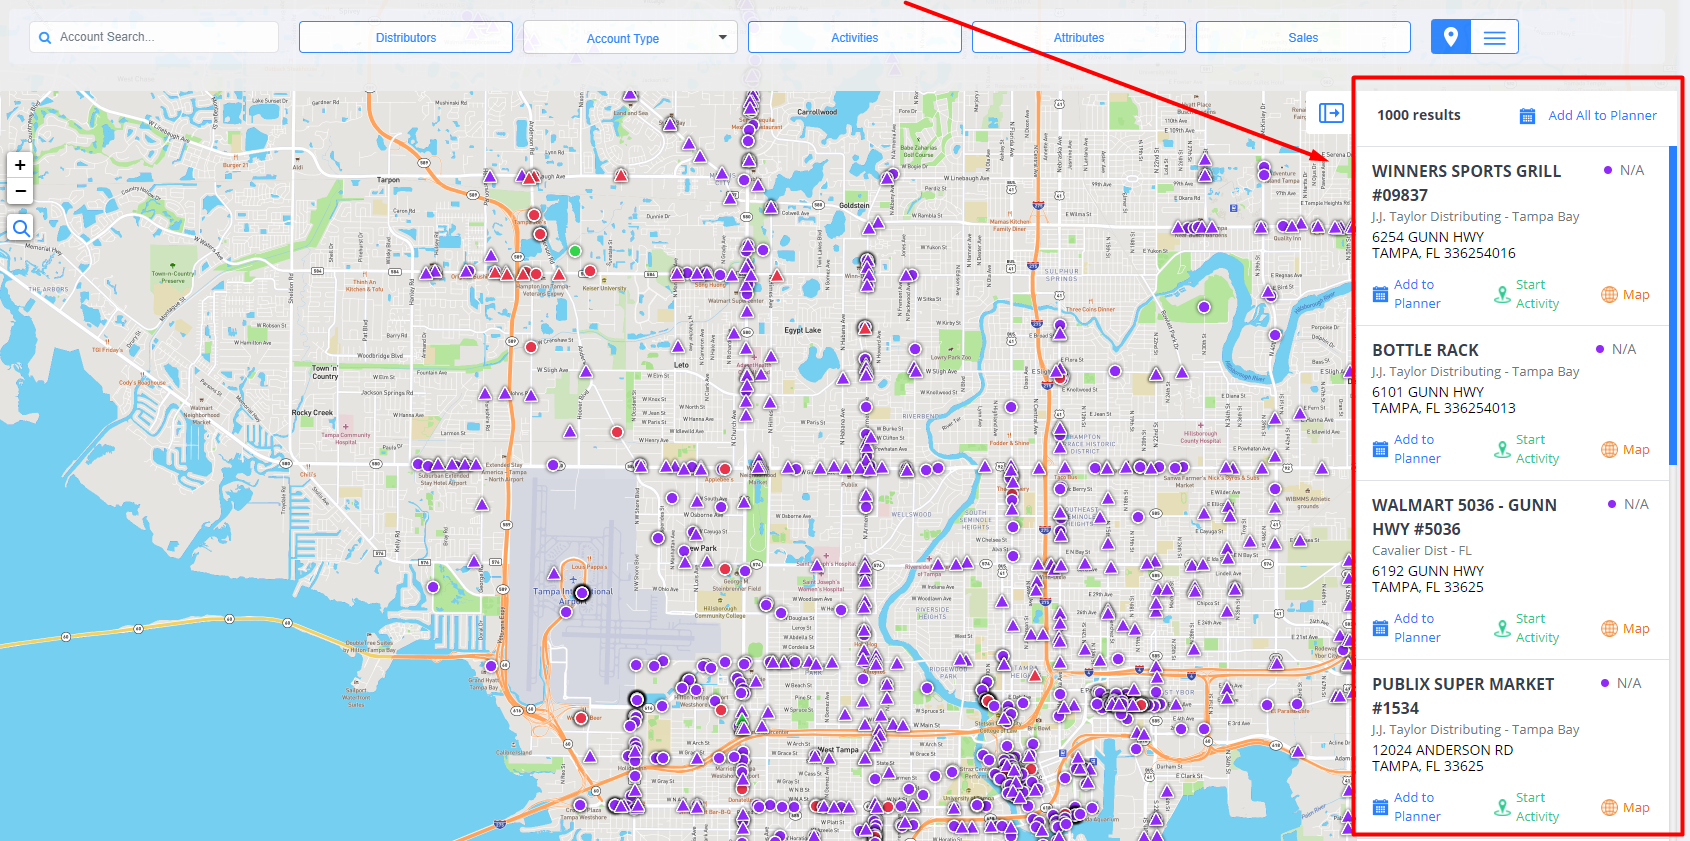
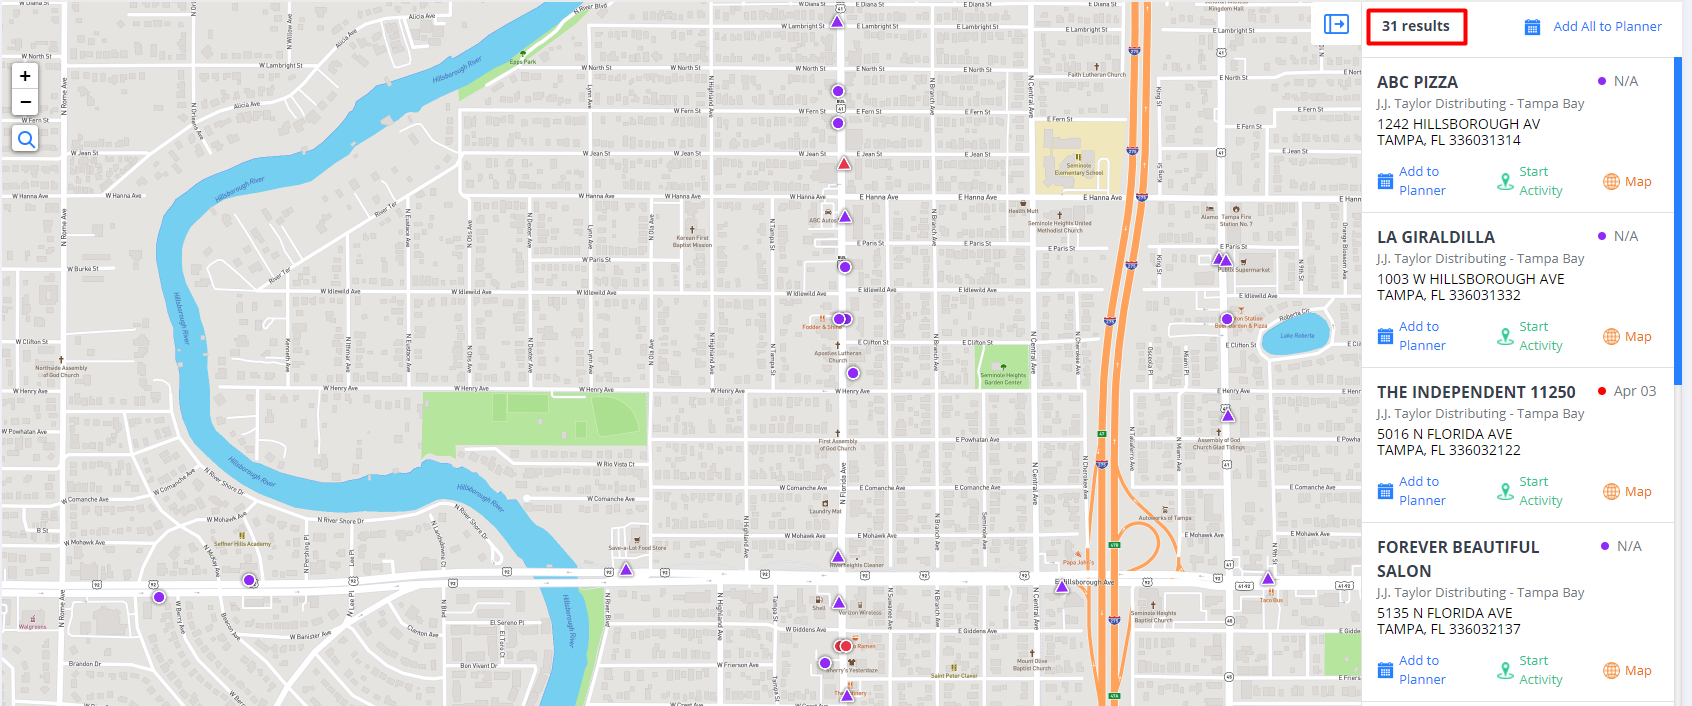
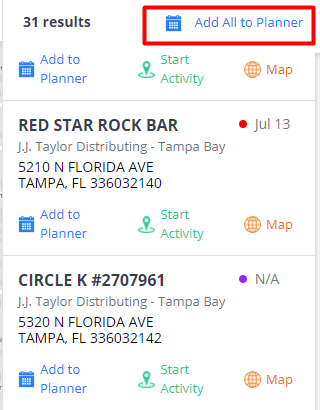
Accounts Results List
To the right of the account map, you'll notice an accounts results list. These results are based off of the area of the map you're currently hovered over.
As you move to different areas across the map, the accounts on the results list will change. Zooming in or out will increase or decrease the amount of results that populate on the results list.
The wider (more zoomed out), the more results will populate.
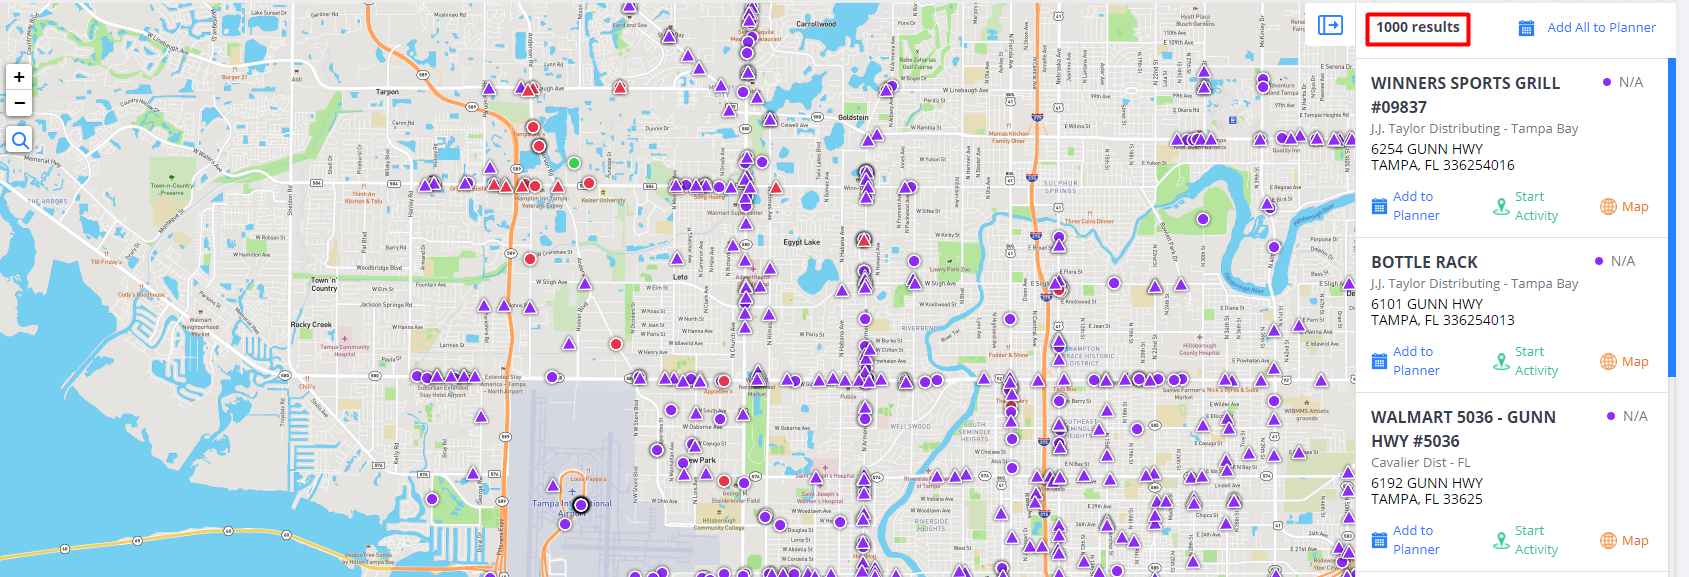
The narrower (more zoomed in), the less results will populate.
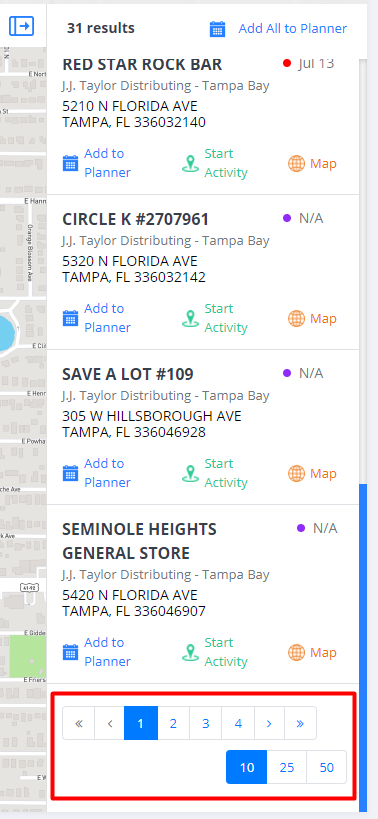
If you scroll towards the bottom of the list, you can switch pages to view the rest of the results and/or adjust how many results (10, 25, 50) are visible on the list at once.
The results list displays basic information such as account name, address, and the distributor tied to each account.
You can also complete a few Lilypad actions from here: clicking Add to Planner allows you to create a planner item, clicking Start Activity allows you to log Activities and Tasks available to you, and clicking Map will take you to the area of the map that account is located.
Lilypad's account activity color designation is also visible to the right of each account name. If Green or Red, an associated date will appear next to the colored dot indicating the last time a market action (Activity, Task, Placement) was completed in that account.
Add All to Planner
At the top right of the accounts results list, you'll see the Add All to Planner button. This will allow you to do mass addition of a single planner item for each account populating on the list.
**NOTE: Prior to clicking the Add All to Planner button though, remember that you can impact which accounts and how many of them populate on the results list by moving and zooming around to different areas on the map. This feature is great way to pre-plan entire days, weeks, or months all at once, especially if/when you know in advance the particular city or area you'll be working.
Add Planner Items window
Once you click Add All to Planner, the Add Planner Items pop up window will appear for you to create a planner item for each account that was on the results list when you clicked the button.
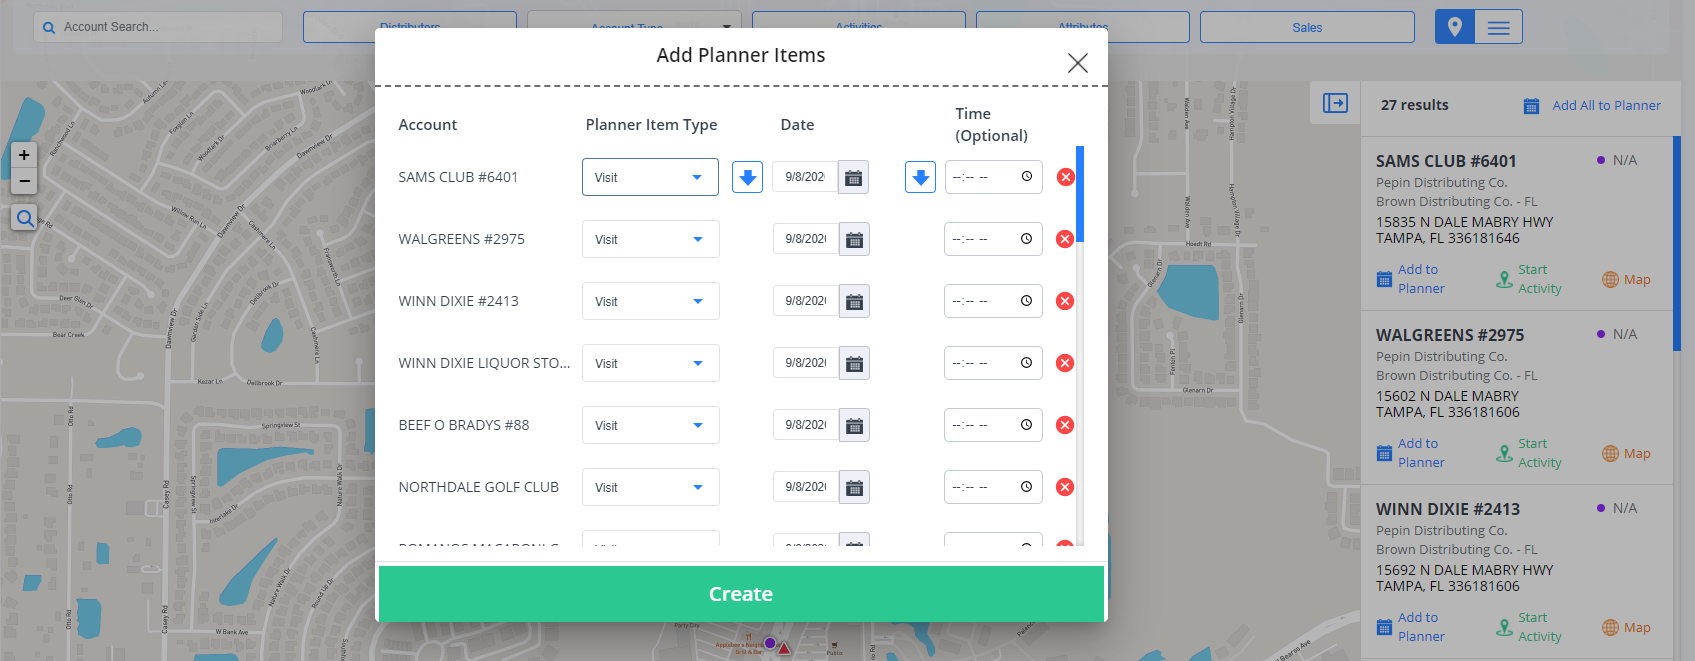
In the Add Planner Items pop up window you'll see 4 columns: Account, Planner Item Type, Date, and Time (Optional). You are able to adjust the last 3 columns based off of your needs.
- Planner Item Type: Though this defaults to Visit, you can click the drop down arrow to choose either Follow Up or Event as well.
- Date: This column defaults to the current day. You can make changes by clicking into the date box, or on the calendar icon, which will open a mini pop up calendar showing dates and corresponding days of the week for you to choose from.
- Time (Optional): As the name description mentions, this column optional. Although, we highly recommend utilizing it to assist you in more efficiently scheduling your day.
You'll notice blue down arrow icons next to Placement Item Type and Date columns. These serve as a mass auto-fill function for you to more easily enter information. **NOTE: This button works based off of the data in the Planner Item Type and Date columns for the first row. For example, if the account in the first row is set for Event and 9/1/20, then hitting the arrow would auto-fill every row after it with those selection options.
To the right of each entry, you'll see a red x icon. You can click this to remove any accounts that you do not want to include in the Add All to Planner process.
Once you have just the accounts you want and have entered all the information for each entry, click the green Create button at the bottom of the window. **NOTE: You can access your Lilypad calendar either mobile or web app to confirm that all your entries were correctly entered (see our Plan - Tab (mobile) or Planner - Tab (web) articles for reference).
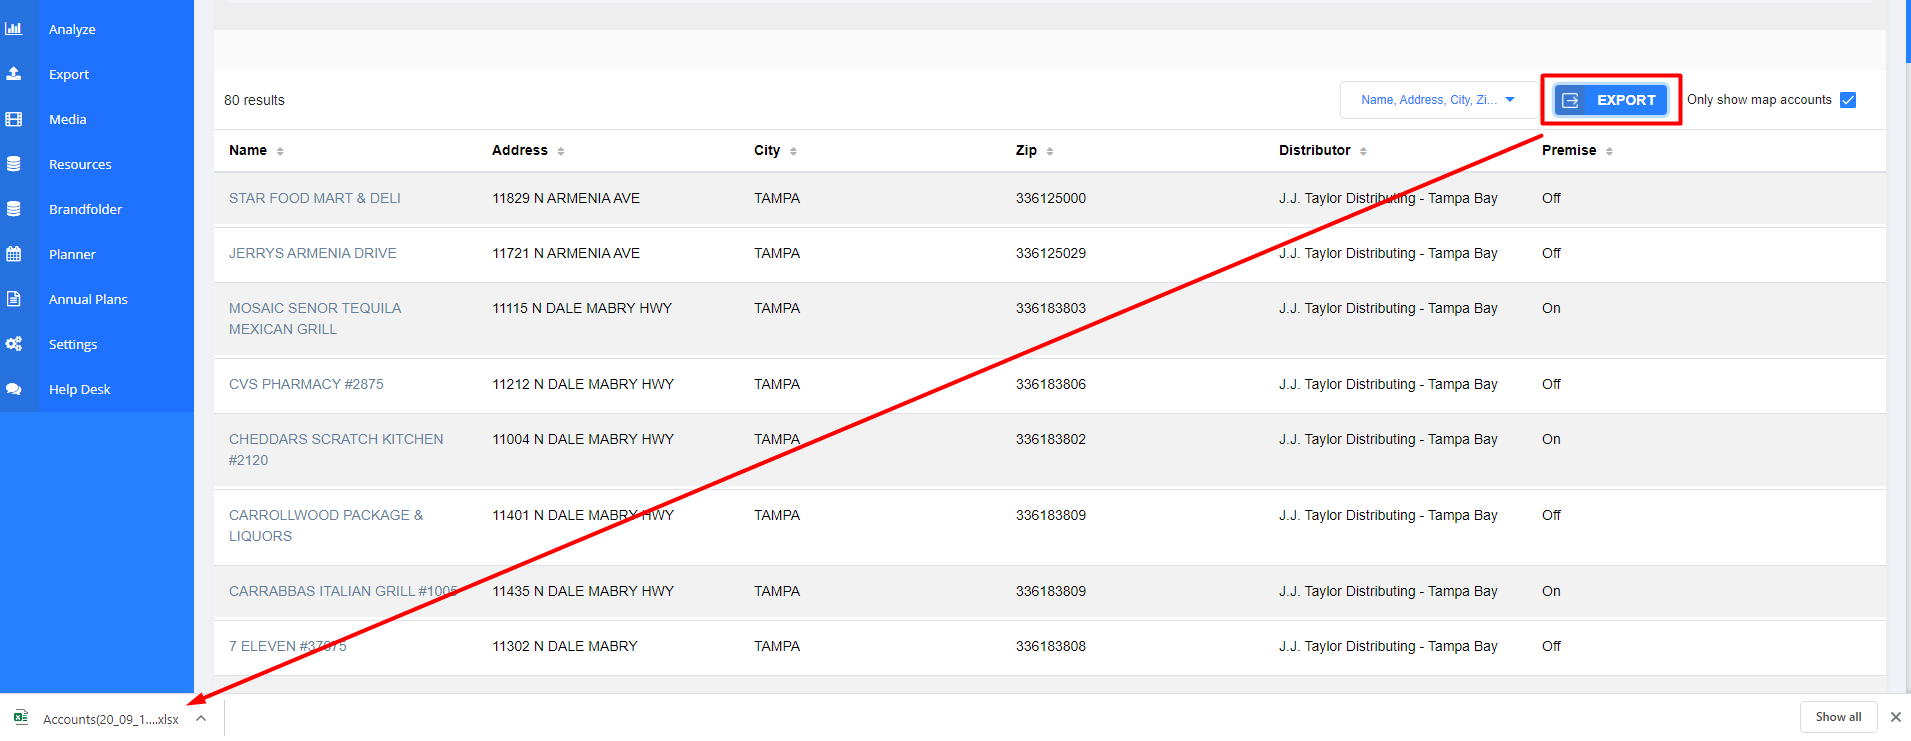
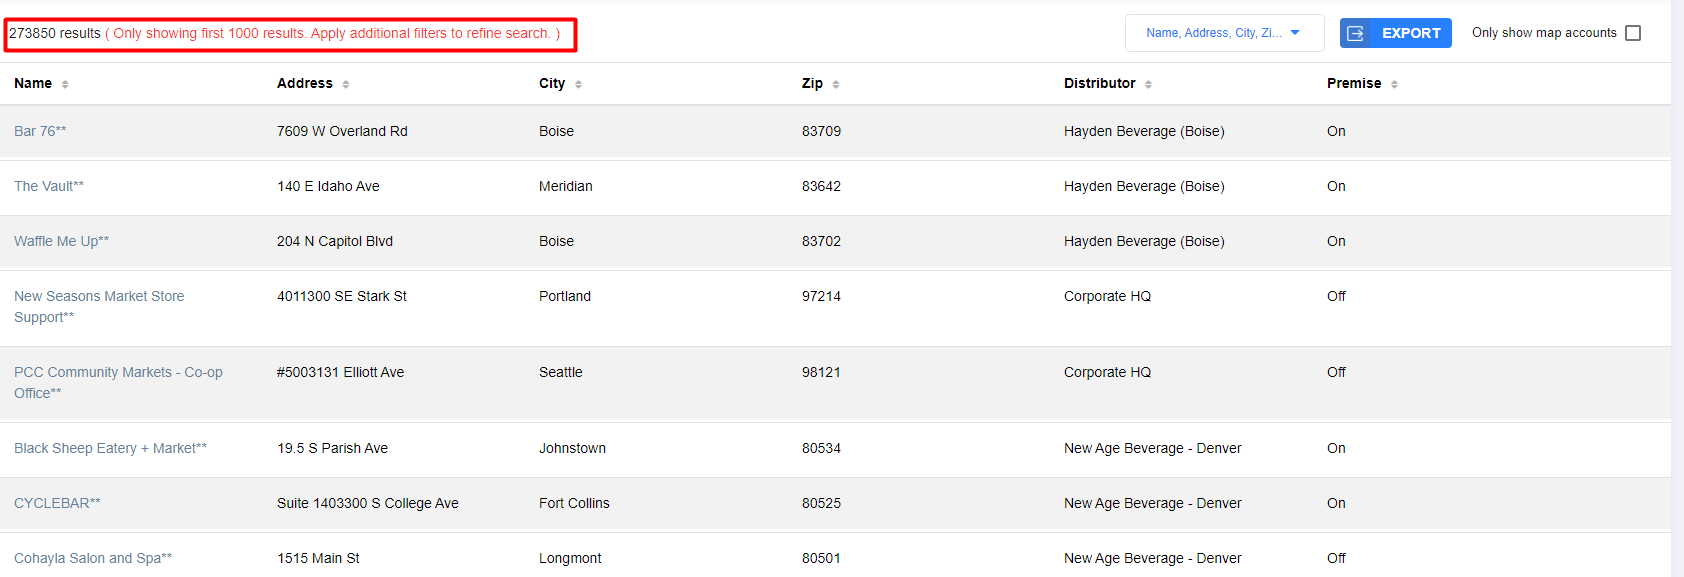
List View/ Functions
As we previously mentioned, the Accounts tab in the Execute - Sidebar defaults to the classic map with pushpins view, but you can also switch to just a full list view of all the accounts in your account universe.
To do this, simply click on the button with the 3 horizontal lines directly next to the pushpin button.

This list view defaults to populating all accounts in the entire account universe (only able to show 1,000 results at a time)
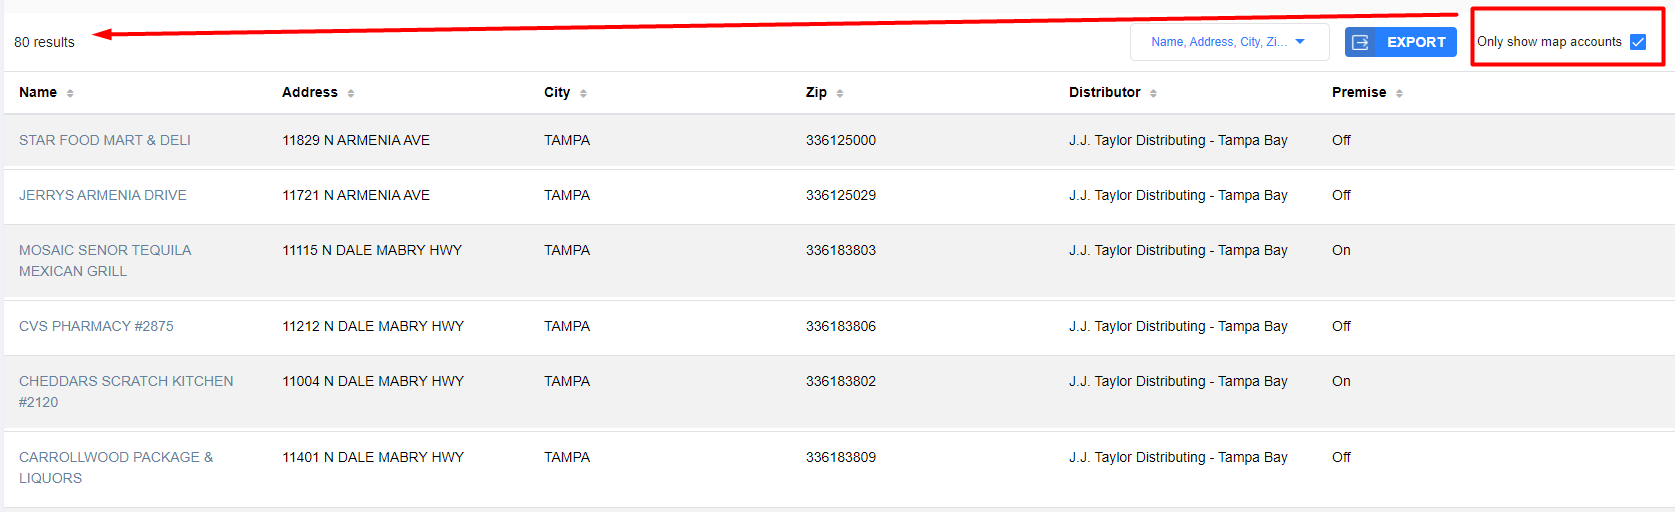
By checking the Only show map accounts box, you can adjust the list to populate only accounts from the specific area you had moved or zoomed to while you were in map view.
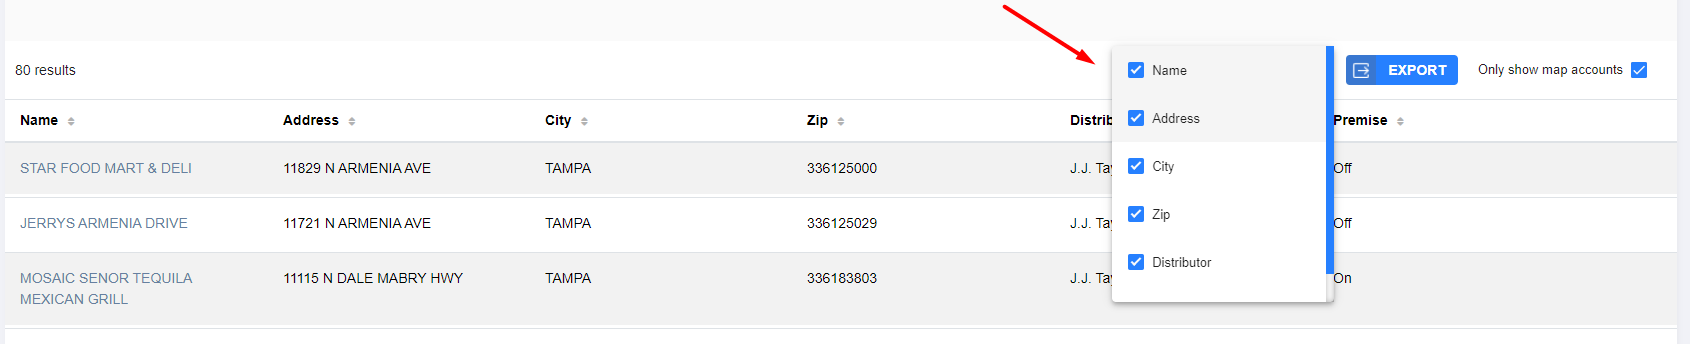
 You can choose which columns you'd like to view within the table of accounts that populate by opening the drop down to the left of the Export button (located next to the Only show map accounts checkbox).
Lastly, you can export this list of accounts by clicking the blue Export button. This will provide you with an immediate download of the list as an excel file.