- The steps below outline how to use the Activity and Task builder located in the Settings - Sidebar (web application) to create the surveys available for your reps/users to choose from while logging and capturing data out in the market.
When choosing which to build, it’s helpful to consider Tasks: "as market actions that are almost always done in conjunction with an activity" and Activities: "as a market action that easily can stand alone."
For example, it's difficult to sell in a display without first visiting an Off Premise account, but you can visit an Off Premise account without selling in a display. In this example, “Display Built” would be a Task and "Off Premise Visit" an Activity.
Getting to Activity and Task Builder Page

1. Log into the Lilypad Web App ( https://lilypad.app.fintech.com/ ).
2. From the side bar on the left, click on Setting.
3. Under the Organization section, click on the Activities bubble.
Creating New Activities and Tasks
1. First, you'll toggle to either the Activities or Tasks button, depending on what is being created (the button will turn blue for the one that is currently chosen.)
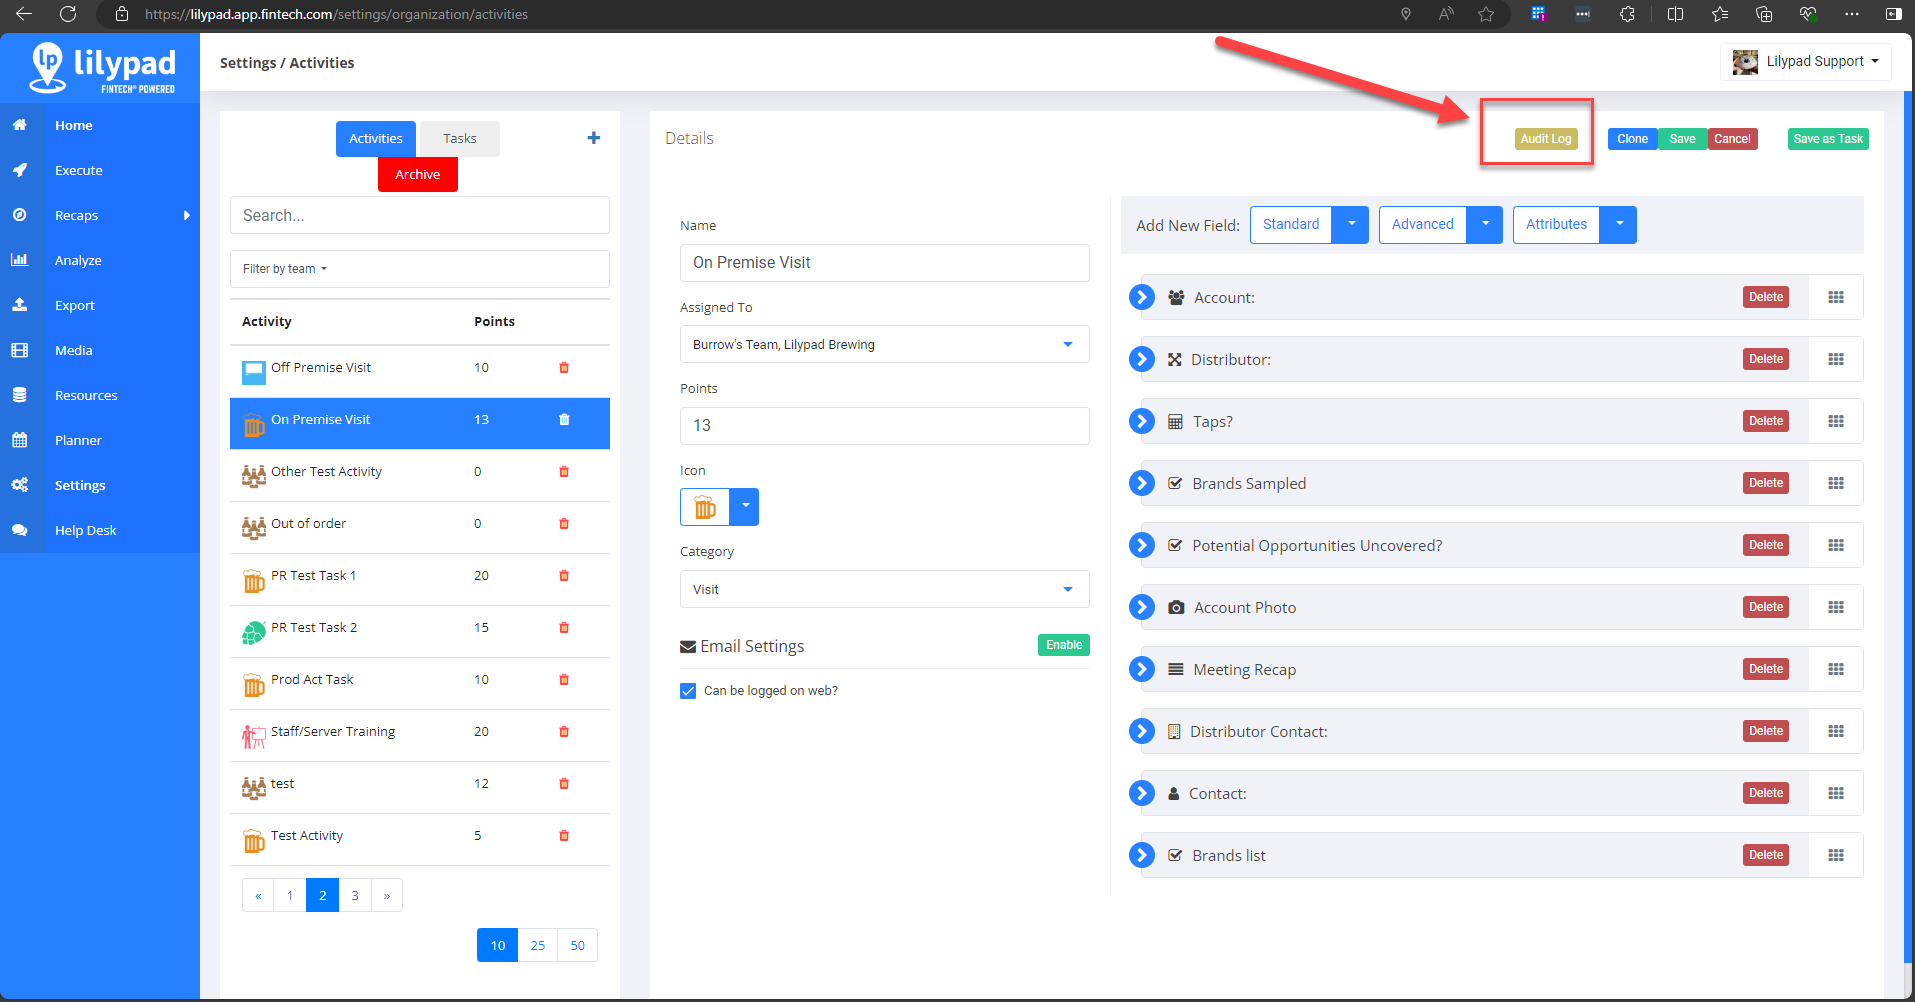
2. Click the blue plus  to the right of the Activities/Tasks toggle. A Details section will populate on the right side.
Completing Details Section
3. In the text box provided, enter a Name for the Activity (or Task).
4. Using the Assigned To drop down , choose the Team(s) this Activity or Task will be accessible to.
5. In the Points box, set the number of points the activity will be worth upon completion.
Best practice surrounding Points, is to weight them based on what market activities are most important to you as a admin/manager, or by what Activities and Tasks take more time, planning, and preparation for the reps to complete (So, an "Event" might be weighted more points than an "Account Visit" or "Account Call").
**NOTE: Use of the Points feature is not required. If you decide not to utilize this feature, simply enter a value of 0 in the Points option box.
6. Using the Icon drop down, choose an assigned icon for the Activity (or Task) within the app. **NOTE: The same Icon can be used for multiple Activities or Tasks
7. Using the Category drop down, choose the most applicable Category to tie to the Activity or Task
Category ties to both the Goal setting process and Distributor Recaps.
In Goal setting in Lilypad, you can choose to track against an individual Activity and Task OR you can track against an overarching Category (meaning that all activities and/or tasks assigned to that Category will track towards that goal).
In Distributor Recaps (and other reporting tools) in Lilypad, Category indicates where within your Distributor Recap reports an entry will land (meaning that by setting activities and tasks to the most applicable categories, your distributor(s) will have an easier time trying to find specific info within the recaps sent to them and admins/managers internally will have an easier time when pulling reports within Lilypad).
8. Click the green Enable button  to the right of Email Settings, if this Activity or Task should generate an automatic e-mail each time it is completed.
Add the e-mail addresses these notifications should be sent to. This can include the user that logged the Activity or Task to initialize an e-mail chain for discussion. Be sure to set the Subject line as well.
**NOTE: You can add as many email addresses as you'd like, simply ensure each address is separated by a comma.
9. Put a check mark in the Can be logged on web check box option, if reps are allowed to log Activities or Tasks from the Lilypad web application at a later time, rather than directly from the mobile app while at the account.
Adding Survey Fields/Components
10. If you'd prefer this Activity or Task to require being tied to accounts in order to be completed, continue with this step. If this Activity or Task does not require being tied to a specific account, skip to step 11.
Using the Advanced field drop down, apply the following four survey fields in the order that they appear: Account, Distributor, Contact, Distributor Contact
Account field
This indicates which account the Activity or Task is to be completed at. Depending on the Account chosen, it will auto-populate the Distributor field if that field is also added. It will also auto-populate the Distributor Contact field if your Distributor reports their Route files to us.
Distributor field
Indicates which distributor(s) are responsible for servicing the account. (Auto-populates based on Account information).
Contact field
Will need to be manually entered by a rep during the first logged entry at an account in the Lilypad app, but will auto-populate on any entry made after the initial entry. This ideally reflects the contact information for either the buyer or owner at the Account.
Distributor Contact field
If the distributor is not reporting their Route file to Lilypad, this will need to be manually entered by a rep during the first logged entry in the Lilypad app, but will auto-populate on any entry made after the initial log.
11. To create the specific survey components (questions, free response, etc.) for the Activity or Task, choose from the different fields types (Standard, Advanced, and/or Attributes) in the Add New Field section. Use as many or as few of these fields as needed.
**NOTE: All the fields listed below (with the exception of the Info field), can be made into a Required field. Required fields must be filled out by the rep before the Activity or Task will save.
Standard Form Fields
Use the Standard drop down menu to add form fields which will make up the body of the activity or task. The standard form field types are:
![]() Text – Used to capture free form, short responses. Small character limit.
Text – Used to capture free form, short responses. Small character limit.
 Longtext – Used to capture free form, long format responses. High character limit. The best option for entering detailed notes. The “Private” checkbox can be selected if the longtext field is for internal use only and should not be included on distributor recaps.
 Email – Used to capture a single email address.
 Checkbox – Used to provide preset options to select from. Able to multi-select from the options provided. Conditional fields can be created for the options provided.
![]() Radio – Used to provide preset options to select from. Only one response can be selected from the options provided. Conditional fields can be created for the options provided.
Radio – Used to provide preset options to select from. Only one response can be selected from the options provided. Conditional fields can be created for the options provided.
- **NOTE: For more information on Conditional Fields, click the link below:
 Photo – Used to capture a single photo. Photos can be be set to “Require new photo to be taken” which will only allow access to the user’s camera, but not their photo gallery.
Number – Used to capture numerical values.
 Date – Used to capture a single date
 Phone – Used to capture a single phone number
Info – Used as a header to provide additional information to the user. Useful in sectioning off different parts of a lengthy survey.
Pro Tip
When creating Checkbox and Radio fields the selectable responses will need to be entered into the Options section.
The Options drop down menu allows for pre-existing lists from Settings / Product Lists to be utilized as the selectable responses, or the Local (add options below) option can be chosen to manually enter each of the selectable responses in the Options window.
- When using Local (add options below) each selectable option must be entered on a new line, so hit the Enter/Return key on your keyboard after each selectable response aside from the final one.
- Use the Do Not Sort checkbox to keep the selectable responses in the order that they are listed rather than being alphabetized.
Advanced Form Fields
Allows the rep to enter the Account, Account Contact, Distributor and Distributor Contact within a survey. (as shown in Step 10)
Attributes Form Fields
Allows the rep to enter any pre-made Attributes into the survey for the Activity or Task. (see our How To - Create A New Attributes article for more details on this feature)
12. Once done, click green Save button towards the top right corner of the screen.
13. Have your reps/users log out and log back in to the app in order to see any new or updated Activity/Task
Archive for Activities and Tasks
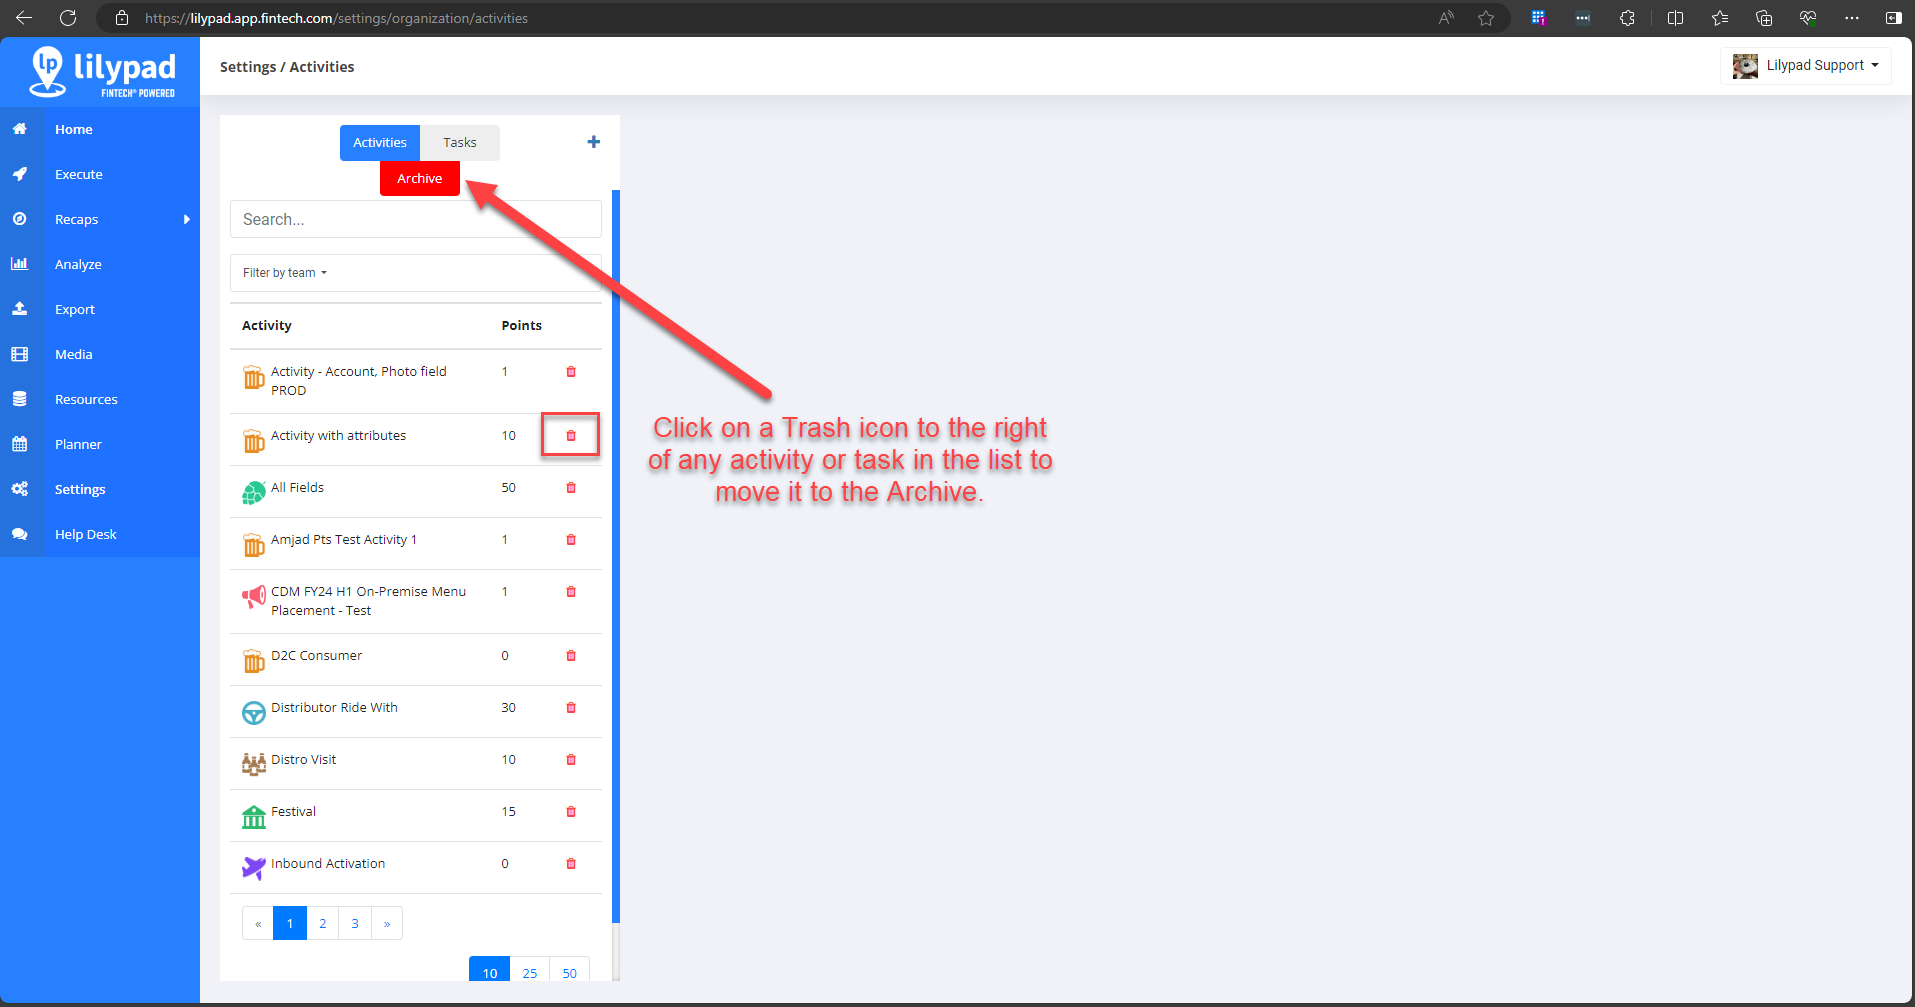
If you no longer want certain activities or tasks to be completed by any of your sales reps in Lilypad, under Settings > Activities click the red Trash icon to the right of any activity or task in the list to move it to the Archive.
Click the Archive button to view a list of activities and tasks that have been removed from the list of selectable surveys in your instance of Lilypad. The Archive screen shows the following information:
- Survey Name - This is the name of the activity or task that was removed.
- Activity or Task - This column shows if the survey was an activity or task.
- Date Created - The date the survey was created in the settings before it was removed.
- Date Deleted - The date the survey was moved to the Archive. The entire list is sorted by Date Deleted with the most recently deleted survey sorted to the top of the list.
- Deleted By - The email address of the manager who removed the survey.
-
Actions - Hover your cursor over any of the 3 action icons to reveal a popup tooltip message that describes each action.
- Undo Delete - This will remove this survey from the archive and move it back to its original position in the list of surveys.
- Clone Survey - Allows you to create a clone of this archived survey and put the new clone in the active list of Activities or Tasks.
- Remove from Archive - This will remove the survey from the archive altogether. Historical data will not be lost.
**NOTE: Moving a survey to the Archive, or permanently removing it from the Archive, will not delete any historical data tied to that activity or task. This includes any data viewed on the following screens in Lilypad mobile and web:
- Mobile History tab
- Account profile Logs
- All Reports and Exports
- Distributor Recaps
- Mobile > My Stats
- Goals
- Mobile > Manager tab
- Account pushpin colors
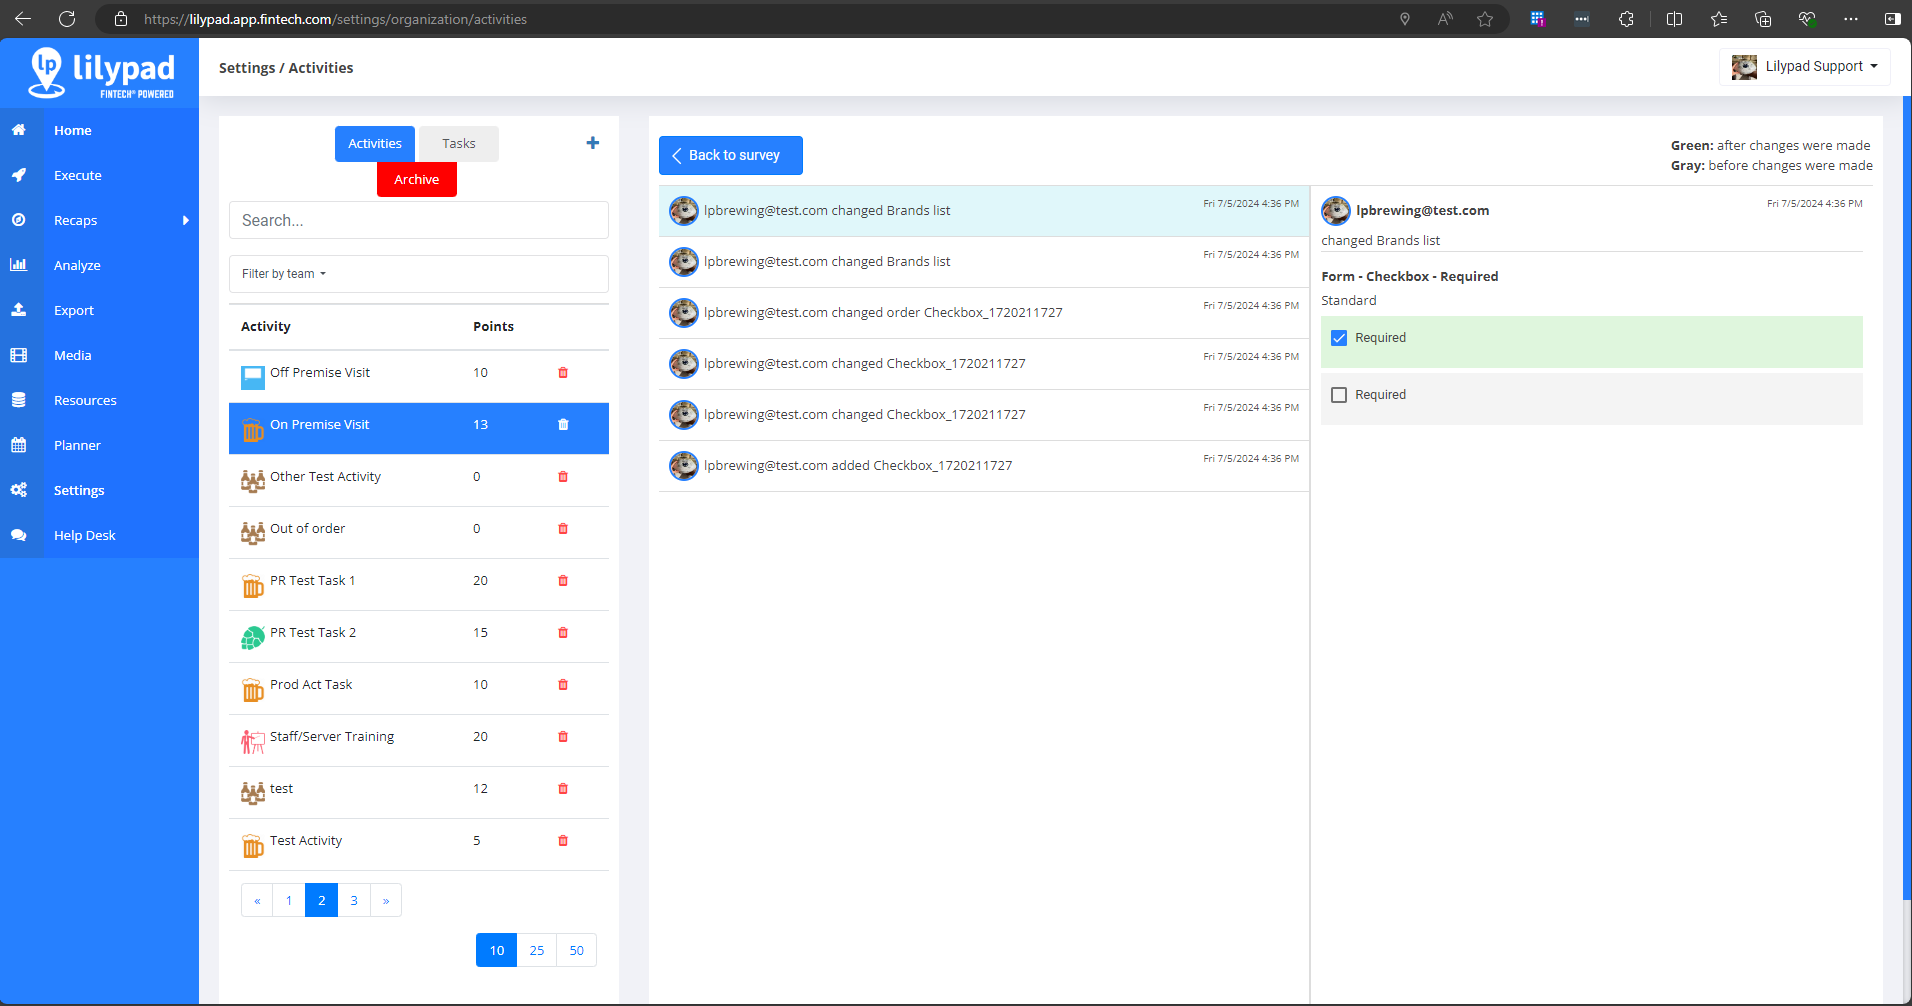
Audit Log
The Audit Log records every change made to the Settings screen of an Activity or Task template. Each change will show a date stamp, time stamp, and the email address of the admin who made the change. Click the Audit Log button at the top of any Activity or Task template to open the Audit Log screen.
**NOTE: Changes are recorded to the Audit Log only after clicking the "Save" button at the top of an Activity or Task settings screen. It is recommended to save often when making several changes to an activity or task template.
The Audit Log screen has two columns that show the following information:
-
First Column
- Email address of the admin who made the change.
- Which field was changed.
- Date stamp of when the change was made.
- Time stamp of when the change was made.
-
Second Column
- Detailed changes made to the field. The green section shows the newest state of the field after changes were made. The gray section shows the previous state before the new change was made.